So, back-injury boy got his sorry back-injured butt out of the doldrums and actually did some real work in the garage. And I’m not talkin’ about cleaning red overspray off one bolt head. It’s something genuinely useful and interesting.
And stuff went wrong.
But that’s why you folks still tune in here, isn’t it? ISN’T IT?!?
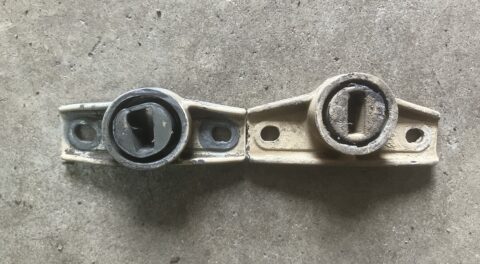
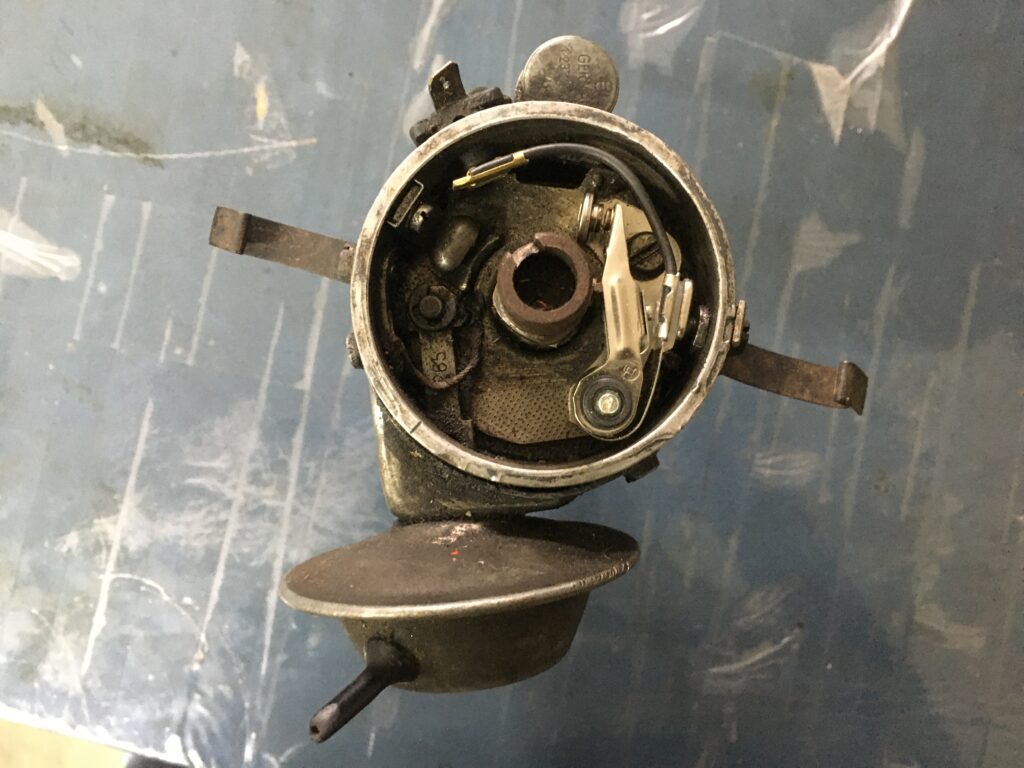
A year ago, I wrote a piece about the mutant distributor in Hampton, my 49,000-mile ’73 2002. In it, I explained how 2002 distributors can be centrifugal advance only (’72 and ’73 tiis), vacuum advance, vacuum retard, or vacuum advance and retard, and how I always thought that all of the vacuum retard dizzys had reversed (left-opening) points (first photo below) and so was surprised when the dizzy in Hampton was vacuum retard but used standard right-opening points (second photo below).

On the left, a vacuum advance dizzy with right-opening points, and on the right, a vacuum retard distributor with reversed left-opening points. Photo courtesy of “76mintgrun02” and bmw2002faq.com.
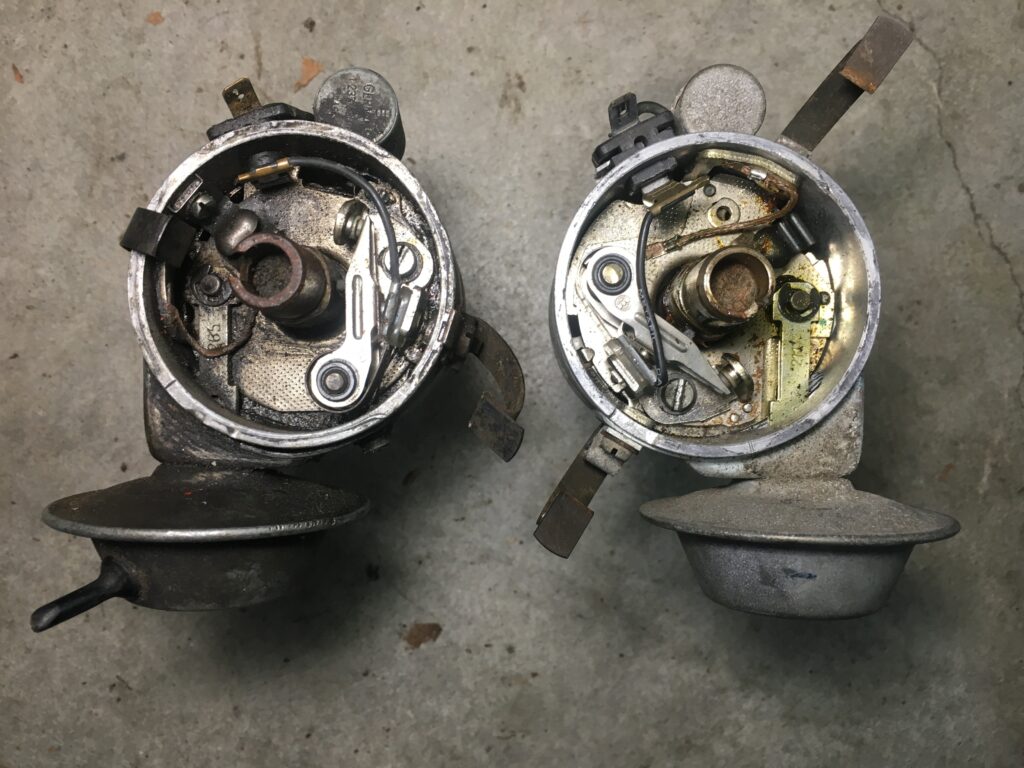
A vacuum-advance unit with right-opening points (left) and Hampton’s vacuum retard dizzy (right), also with right-opening points.
But more to the, uh, point, now that Hampton has transitioned from uptight original wallflower to I guess we ARE going to have some fun together, I feel less constrained by a caretaker’s need to be responsible for the car’s originality. I’m not going to flare the car’s fenders or anything, but the vacuum retard distributor is like the non-functional EGR plumbing that I removed a year and a half ago. It’s a relic that doesn’t really serve a useful purpose. For a car of this era to run as well as possible, you generally want vacuum advance during startup, idling, and constant-throttle cruising.
A while back, I began looking for a vacuum advance dizzy (which, as I described in the mutant distributor piece, has the vacuum pod on the lower left and the right-opening points on the right). Just before Christmas, 2002 good guy Adam Menges advertised on one of the Facebook 2002 parts pages that he had a few distributors for sale. I asked him to scope out if any were vacuum advance. He found two. One was part number 0 231 115 081 for a U.S.-spec 2002. The other was 071 for a Euro car. He said that the 081 unit spun free and smooth and quoted me a fair price for it, but the 071 unit had a notable amount of resistance so he offered to throw it in for free. I Venmo’d him the money. I’d actually been looking forward to doing the swap, as it’s the kind of easy contained repair where there’s a clear beginning, a clear end, no slippery slope, and nothing can go wrong.
Go wrong.
Go wrong.
(Cue the original Westworld memes.)
When you need to swap out a distributor, the first thing to do is rotate the engine to top dead center (TDC—the top of compression stroke of cylinder number one). You can get it in the ball park by looking for where the rotor in the distributor aligns with the notch on the rim, and then align the TDC mark on either the flywheel or the crank pulley, but both of those can be hard to see, so what I usually do is just pull the valve cover which takes all of 60 seconds in a carbureted 2002, and rotate the engine until the little line on the flange behind the cam gear is right in the middle of the oil distribution tube.
Right there.
Then you pull the distributor cap off, pull the wire off the connector to the condenser, loosen the 10mm nut on the collar holding the distributor in place, and lift the distributor straight up. Have a paper towel ready to wrap around the gear at the bottom, as it’s sitting in oil and will drip. When you lift the dizzy up, note how the rotor rotates counter-clockwise due to the angle of the teeth on the gear at the bottom. You’ll make use of this when you put it or another unit back in.
If you’re installing a new unit like a 123 Ignition distributor, you follow their instructions, but if you’re staying old school and installing new points and condenser in an old unit, it’s easier to do it with the distributor out. Then take an 0.016-inch feeler gauge and set the point gap. You’ll fine-tune it by setting the dwell later, but get it in the ball park.
It’s at this point that I start to realize “Oh, crap, there IS a slippery slope here after all.” As I and others have written, the quality of new points and condensers have gone straight into the crapper, and for that and other reasons, on cars that I road trip, I come down firmly on the side of electronic triggering units like Pertronix (the other reasons include never needing to set the dwell, and the fact that unchanging dwell means that you’ll no longer have narrowing point gap causing the timing to drift). Now that Hampton and I are buddies, and I have a twinkle in my eye regarding possibly driving the car to The Vintage this year, the idea of throwing a Pertronix into it makes sense.
Except, yeah, well, do I have a Pertronix here in the garage? No. Of course not. I’d saved up this perfect little half-hour job for the right moment, decided that was now, but I didn’t think it through, and, well, here I am.
Okay then. Forward. Slightly modified goal—install the new distributor and get to the point where I can judge whether or not it works, meaning whether the centrifugal advance mechanism actually advances the spark. If I want to pull it back out later and install a Pertronix, fine. Good? Good.
I examined the points that were in the distributor, and one of the point faces looked partially eaten away. I have some new points and condensers that came with one of the parts hoards I inherited. As I said, I don’t really trust new ignition parts, even in Bosch boxes, but it seemed the thing to do.
But I immediately ran into a problem—the little screw holding in the points just spun in the hole. I had to rotate it with needle-nosed pliers to pull out out. Damn, I thought—the hole in the distributor plate is stripped. The entire job suddenly was in jeopardy. As I entertained options—swap in the plate from another distributor? tap out the hole to the next-larger thread size?—I hoped against hope that maybe it was the screw that was stripped, not the hole. I tried the screw from another dizzy, and, bingo.
New points in, gap set.
New points in the new-old vacuum advance dizzy.
When you install a distributor, the thing to pay attention to is that the screw holding down the points needs to face the front of the car. You need to be able to get a screwdriver onto the screw when you adjust the point gap. Unfortunately, this usually puts the notch on the rim of the distributor for #1 spark plug under the cowl, so you can’t directly look down on it and the rotor and see when they’re aligned, but there’s a way to deal with that.
So what you do is point the rotor at the notch on the rim, then rotate the rotor counter-clockwise by about 30 degrees, orient the distributor so the screw holding down the points is facing forward, drop the distributor into the hole, watch how the rotor moves clockwise as the gear at the bottom meshes with the gear on the back of the cam, then rotate the body of the dizzy until the rotor is aligned with the notch. As I said, you can’t easily see that directly, but the trick is that you can see the points opening. The rotor is aligned with the notch not when the points are at their widest open, but when they just start to open. You can not only see this, you can usually feel the resistance caused by the spring in the points when you turn the body of the dizzy as the lobe on the distributor shaft pushes against the points’ nylon block. Neat, huh?
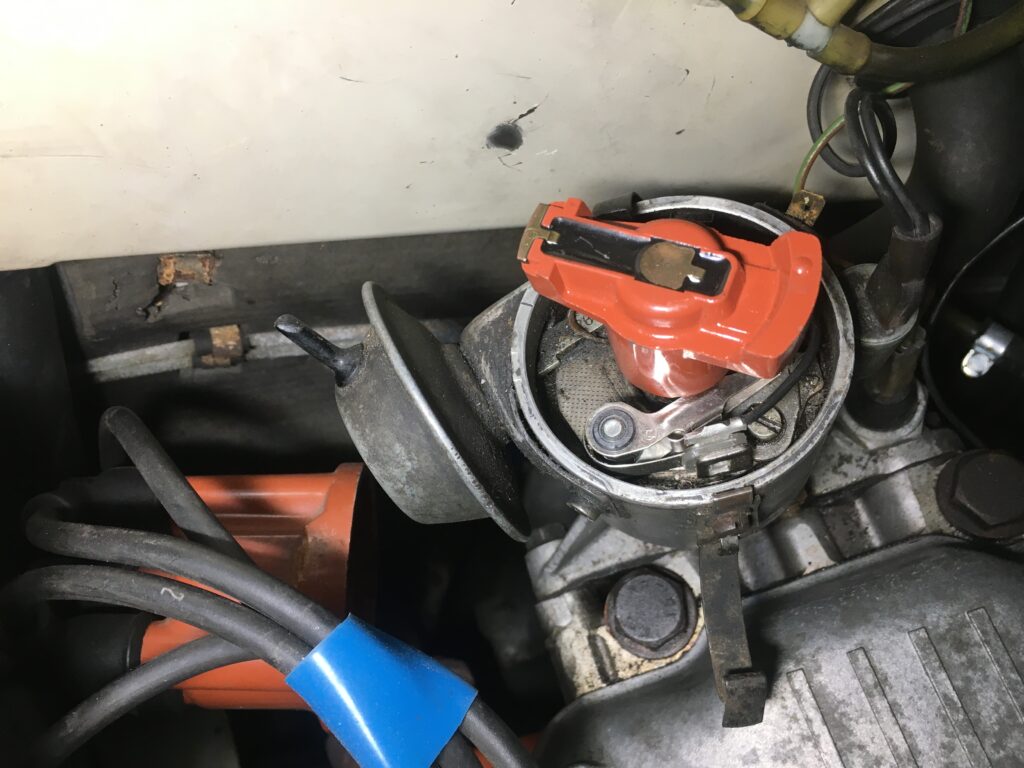
Distributor correctly installed with points screw facing forward and rotor pointing to notch, even though from the angle it doesn’t look like it.
Another trick I employ is to test that the newly-installed distributor is triggering the coil before I even start the car. I connect a remote-start switch to the starter solenoid, turn the key to ignition, hold the thick wire from the center of the coil 1/4-inch from a ground stud, squeeze the remote start switch to crank the engine, and check for spark. I did this on Hampton, and, surprisingly, found no spark.
Despite the shortcomings of points-and-condenser systems, they’re delightfully primitive, and it’s always possible to fully diagnose no-spark problems. It can only be (in order from most likely to least likely) points not opening, condenser not working or not grounded, a dislodged connection to the coil or distributor, or the ignition coil itself being dead. I checked the screw holding on the condenser, and found it loose. “A-HA!” I thought. I’ve had this happen before. Clearly this was the cause. I tightened the screw and… still no spark. I cranked again while I carefully observed the points to be certain they were opening and closing, and they were. I checked the coil connections and found them all good.
Hmmmn.
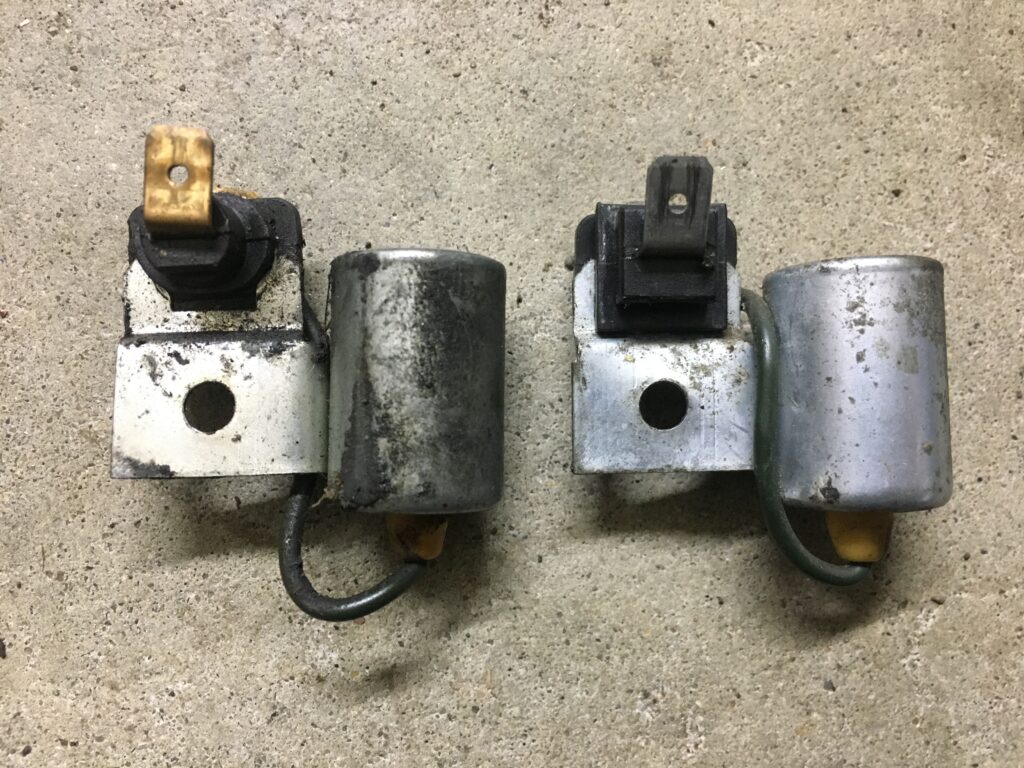
Okay, then. Must be the condenser. If the points were absolute trash, maybe the condenser’s bad as well. For efficiency’s sake I thought I’d just transfer the known-good condenser off the car’s original dizzy, but then ran into the fact that some 2002 distributors have a round condenser plug hole and others have a square hole, and of course this was the case with the two I was dealing with—the vacuum advance unit had a round hole and the original retard unit had a square one.
Why, God? Why?
Even though, as I said, I don’t trust new ignition parts, I didn’t seem to have much choice, as the only round-plug-hole condenser I found was a brand-new Bosch one. I installed it, and was more than a little surprised when I still had no spark. It was at that point that I looked carefully at what I was doing, which was testing for spark by holding the center coil wire close to one of the front strut tower studs. This was very careless of me. These are not guaranteed to be a good ground. The valve cover studs are much better. I tested for spark there and immediately got it. There probably never was anything wrong with the condenser.
The next incremental step is to check for spark at the plugs, as this verifies that the rotor and cap are functioning. I tried to slide the original cap onto the replacement dizzy, and found that I couldn’t. Then I remembered that, just like there are two different condenser plug holes, there are two different distributor cap securing mechanisms. The car’s original retard distributor had a slot in the rim that receives a block in the circumference on the cap, but the advance dizzy had the opposite—a post on the dizzy that needs a cap with a recess to receive it. I was fortunate that the combination I had didn’t mount at all, because if you use the other combination, the cap will mount on the distributor but won’t lock in place, creating some surprising effects on ignition timing.

Slot wars.
I dug around in my used ignition parts box, found the right cap, cleaned a bit of corrosion off the terminals, and installed it. I then checked for spark at #1 plug, found it, and prepared to start the car for real.
Again, the goal here was simply to check that the newly-installed distributor was working. I’d already checked the vacuum advance mechanism by connecting a thin hose to the diaphragm, sucking on it, and verifying that the distributor plate moved. Mechanical advance is verified by using a timing light, shining it at any timing mark anywhere, revving up the engine, and verifying that the mark moves. If it doesn’t move, there’s no advance with increasing rpm. It’s astonishing how many vintage cars are running around with distributors that don’t advance at all.
So I dug out my timing light and connected it to the battery and #1 plug wire. Since the car had been sitting all winter, I knew that the carburetor float bowl was likely empty, so the quickest and easiest thing to do was to give it a blast of starting fluid while cranking. Since I still had the remote start switch connected, that was trivial to do. I goosed in starting fluid while I cranked, the car fired up immediately and settled into a nice idle, at which point I heard a little tick-tick-tick and watched with horror as the cable from the remote start switch got sucked into the fan.
You careless idiot.
Fortunately, no real damage was done, but it took me half an hour to extricate the thing. I actually have a soft spot for this Sears remote start switch, as I remember buying it, along with my first timing light and “engine analyzer” (rpm and dwell meter, which I still have) in Austin in 1982 when I bought my first 2002. It’s definitely the worse for the wear (the clamps were ripped off the ends of both wires), but I think it’ll live to trigger another day.
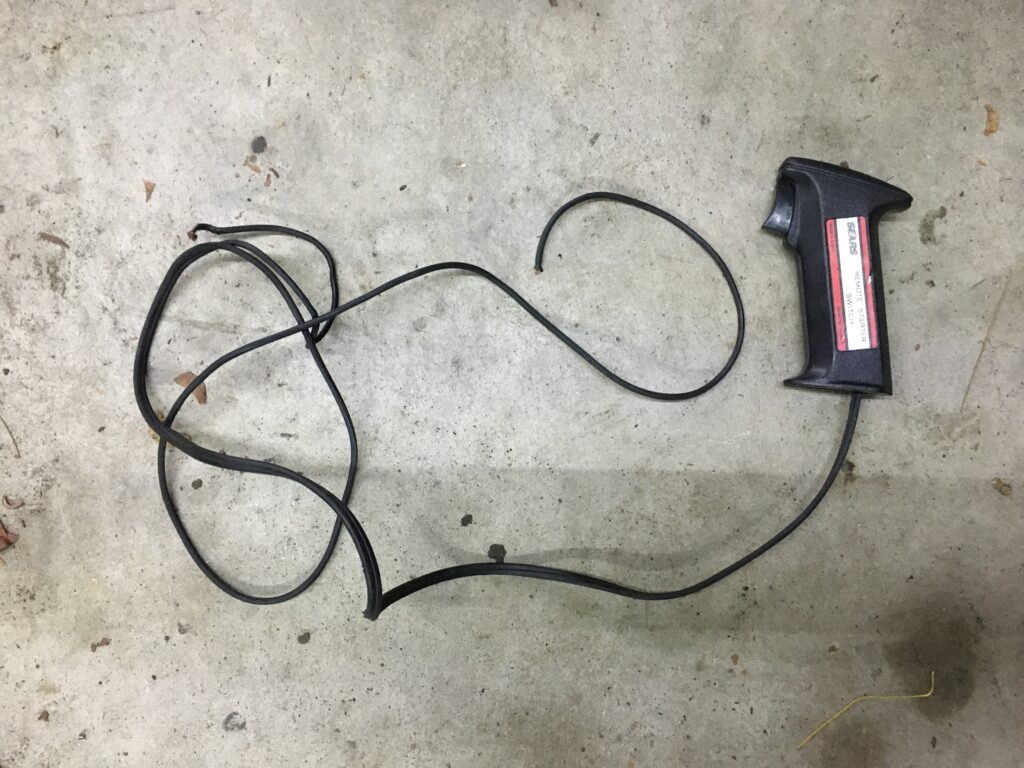
The poor thing.
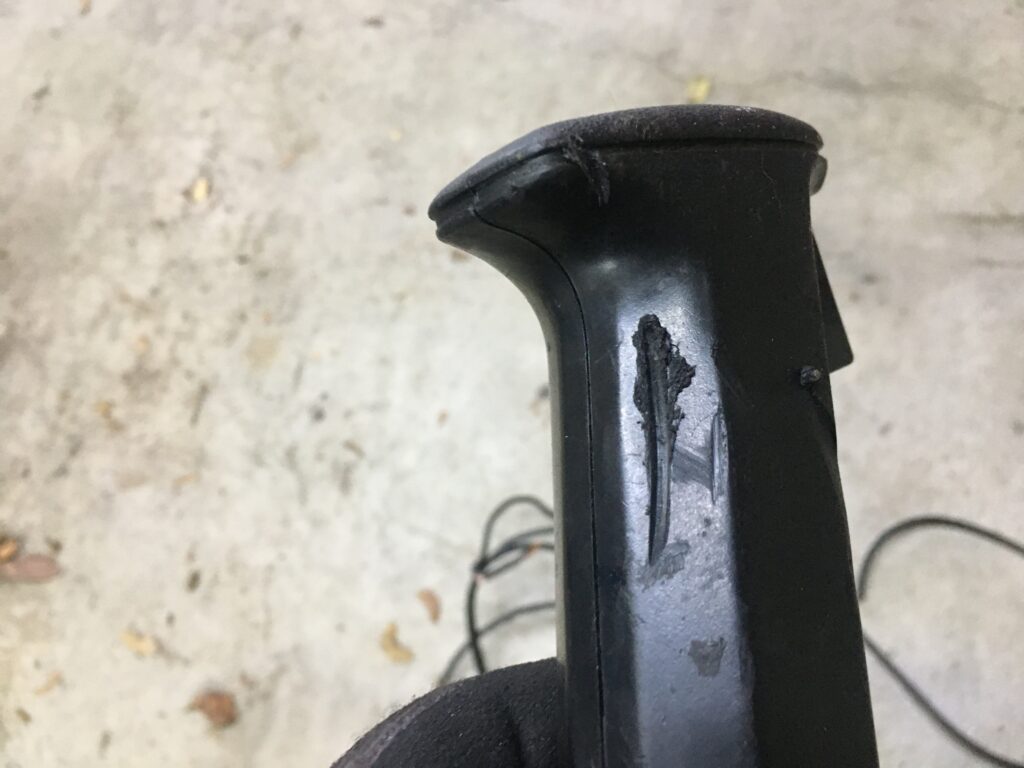
Battle scars.
With the remote start switch violently removed, I reconnected the ignition connection to the solenoid, made sure that the wires to the timing light were far away from the fan, and started the car. I have a TDC mark painted on the crank pulley so it’s very easy to see. I hit it with the timing light, reached back to the throttle linkage to rev up the engine, and clearly saw the mark rotate as I varied engine rpm.
The replacement distributor was fully functional.
Whew!
And, with that, I called it a day before I broke anything else.
I think I’ll be more circumspect about regarding any future repair as easy, contained, and not having a slippery slope.
—Rob Siegel
____________________________________
Rob’s newest book, The Best of The Hack Mechanic, is available here on Amazon, as are his seven other books. Signed copies can be ordered directly from Rob here.