A few weeks ago I wrote about a longstanding steering issue in Rene, my ’73 3.0CSi, that manifests itself primarily in wandering steering on steeply crowned roads. I put the car up on the mid-rise lift to check for play in the steering components, but found none. I thought that the problem might be tied to the car’s power steering, but I ran the car with the power-steering pump disconnected, and it was no different. I discovered that the inner edge of the right front tire was worn more than the center and outer edge, indicating that that wheel has more negative camber (it’s tilted farther outward at the bottom) than the left one. This rang a bell.
I dug up the measurement sheet from the last time I had the car professionally aligned fourteen years ago (I’ve done DIY alignments on it since), and the numbers showed the front left camber as fairly neutral at -0.08 degrees, but the right front camber at -0.79. In the ensuing fourteen years, the car has had some changes—cut springs and sixteen-inch wheels—probably exacerbating camber issues. The likely cure for all this is a set of adjustable camber plates, but unlike more common BMWs for which you can find adjustable camber plates on eBay for $150, the only plates available for the E9 cost nearly $400 a pair.
Now, the Hack Mechanic (both the column and yours truly) is and always has been all about buying and driving the cars you love without bankrupting yourself by having to pay someone to fix them whenever they need something. Owning thirteen cars, I simply can’t afford to give every one of them everything they need. Hell, I can’t afford to give any one of them everything it needs. So I don’t automatically click-and-buy $400 adjustable camber plates just because I think Rene might need them.
And yet, like everyone else, I have both tolerances and thresholds. That is, certain things don’t bother me at all, while other things drive me crazy. The steering issue with Rene had clearly fallen into the latter category. The fact that I’ve owned my beloved E9 for 35 years and that the steering has never felt right (my Bavaria steers much better) is really beginning to bug the crap out of me.
I decided that what I needed was confirming data.
All I had was a slightly worn inside right tire and a fourteen-year-old alignment spec sheet showing uneven camber; I wanted a current camber measurement. If it showed that the car really had a substantially uneven front-camber problem, I was much more likely to pony up four Benjamins for the adjustable camber plates. I could get confirming data in one of two ways: I could take the car in for a professional alignment, which would likely be useless because of everything I described above, and I’d probably have to pay to have it done again once I’d fixed the car…
… or I could buy what I needed to take a camber measurement myself. There’s no surprise which path I chose, right?
Inexpensive bubble-level-type camber gauges can be found on Amazon for as little as $15. Little cube-shaped digital inclinometers are similarly inexpensive. I bought both, since I am also going through a similar camber issue with the rear wheels of the Lotus, and I didn’t know which one would be more useful in which circumstance.
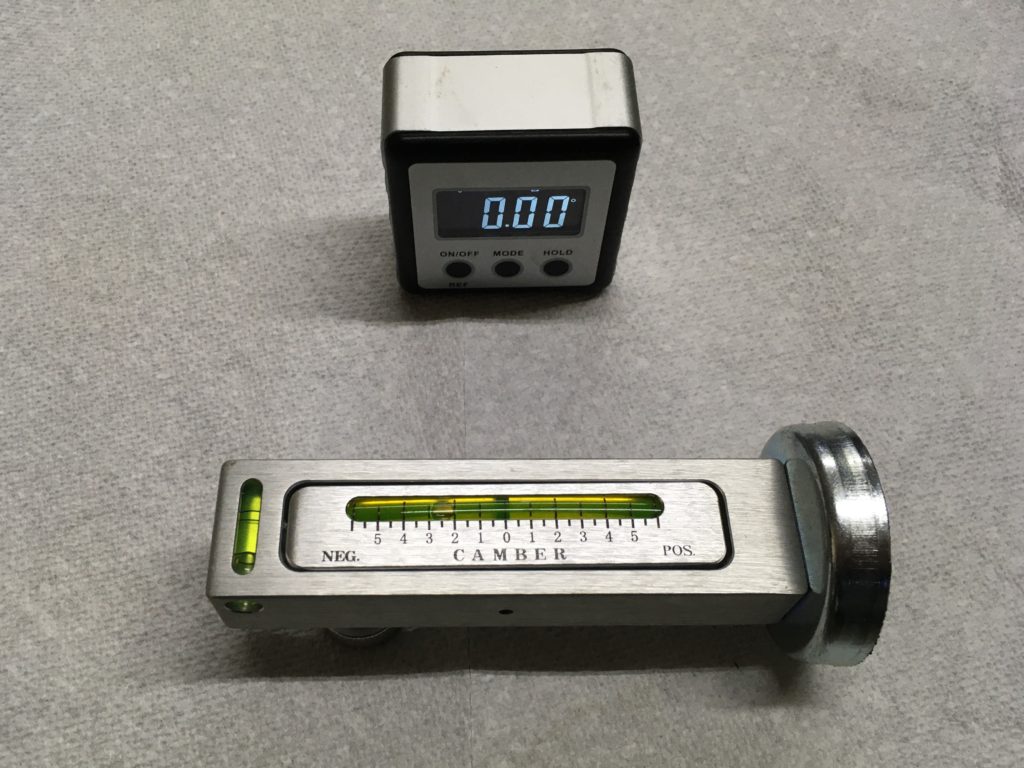
The digital inclinometer (top) and the camber bubble gauge (bottom).
The two gauges each have strengths and weaknesses. The bubble gauge is marked at half-degree increments; with your eyeball, maybe you can interpolate between them to the quarter of a degree (0.25 degrees), but that’s it in terms of accuracy. The digital inclinometer reads out to the hundredth of a degree, but if you read the specs, its stated accuracy is only 0.2 degrees for anything other than dead horizontal. My quick takeaway message is that neither gauge is accurate enough to give you the tenth-of-a-degree camber measurement you’d want for an accurate set-it-and-forget-it alignment, but either gauge will provide what I needed to know, which was whether or not there was a substantial problem (in my case, a substantial camber difference between left and right front wheels).
There’s the additional issue of needing to perform the measurement on a dead-level surface. This proved more challenging than I thought, since my garage floor has a surprising amount of lateral slope to it. You can measure it and subtract it from the readings, or you can acknowledge that your readings may have at least that much error in them.
The camber bubble gauge is just a little bubble level with a magnetic base at roughly a right angle to the gauge, a zeroing mechanism for the bubble level, and another little bubble window so you can position the gauge level with the horizontal plane. The zeroing mechanism is a bit of a pain; to be certain that the thing is working accurately, you need to take an old-fashioned carpenter’s bubble level, find a dead-vertical surface in your house, then use that to zero the gauge. Once that’s done, you can stick the camber gauge on any convenient machined surface that’s parallel to the plane of the wheel.
The digital inclinometer comes zeroed from the factory, but it’s referenced to horizontal. To get a camber measurement, you have to subtract the reading from 90 degrees. Obviously that’s not difficult to do, but you can change the reference from horizontal to vertical by doing the same carpenter’s-level-on-the-doorframe thing to find a dead vertical surface, then hitting a button to change the reference. Then you can directly read camber off it, which is convenient. Like the bubble gauge, the inclinometer also has a magnetic base, allowing you, in theory, to stick it to a convenient machined surface, as you can the bubble gauge.
And therein lies the problem with both gauges.
The Amazon and eBay listings and YouTube videos you see of the camber bubble gauge in action usually show it stuck to the brake rotor, either through the slots in the wheel or with the wheel off. For three reasons, that’s a bit misleading: First, none of my cars except my M coupe have slots in the wheels big enough to pass the two-inch base of the gauge through; the sixteen-inch Alpina open-lug wheels on the E9 certainly don’t. Second, when I tried this for grins on my wife’s Honda Fit—the only car in the driveway that would allow the base of the gauge to pass through the wheel—but the Fit’s brake rotor is small enough that the lip on the edge of the rotor wouldn’t let the magnet sit flat, rendering the camber measurement useless. For it to work, you need a rotor with a swept area wider than two inches—almost certainly not a problem on any modern performance car, but an issue on little cars, both vintage and modern. Third, if you take the wheel off to stick the gauge on the rotor, in order to get an accurate camber measurement you need to first measure the resting height of the sills and the lower control arms, then jack the car so that both of those are at exactly the same height as they are when resting. This is not easy to do.
So instead, you wind up using a different surface than the brake rotor, and that’s a problem because nothing on the outside of the wheel is likely to be a true machined surface. The little plastic center caps on the Alpina wheels yielded inconsistent measurements. The metal dust caps under them are appealing, since they look flat and the magnet sticks to them, but consistency-wise, they were even worse.
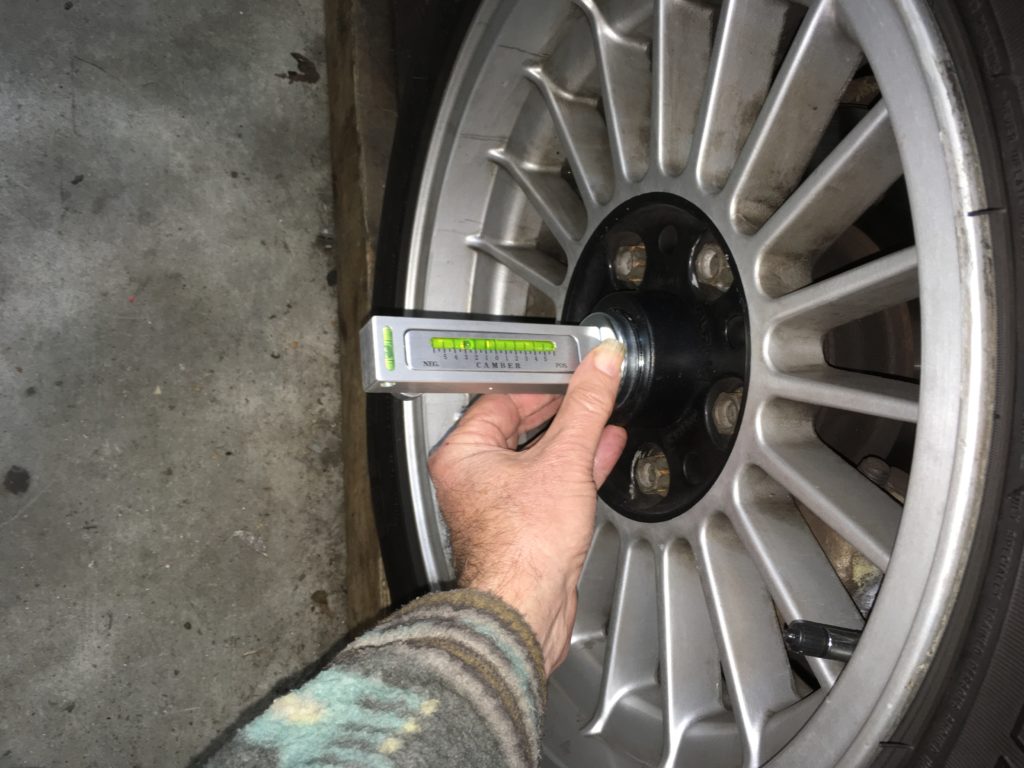
This was easy, but unreliable.
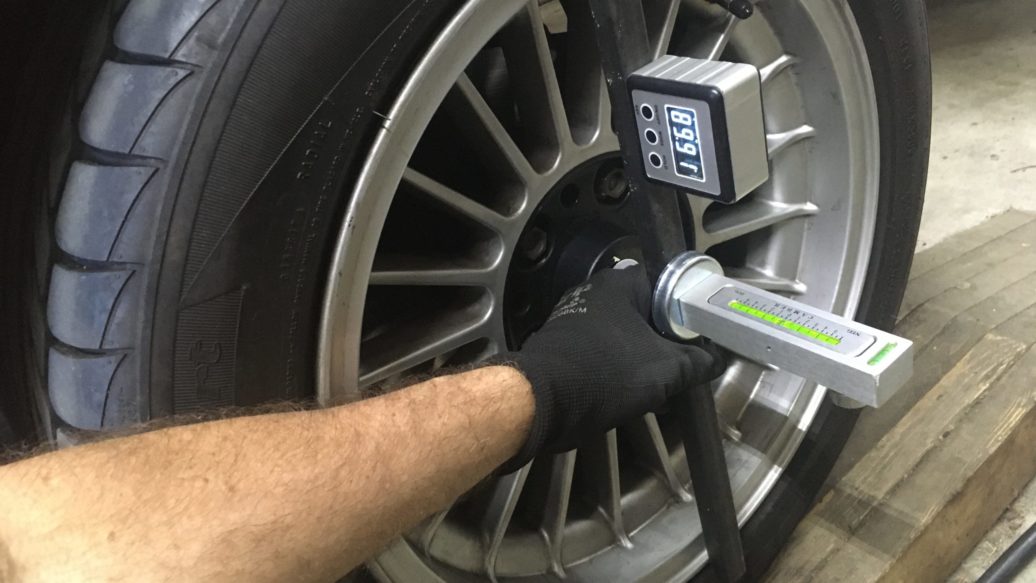
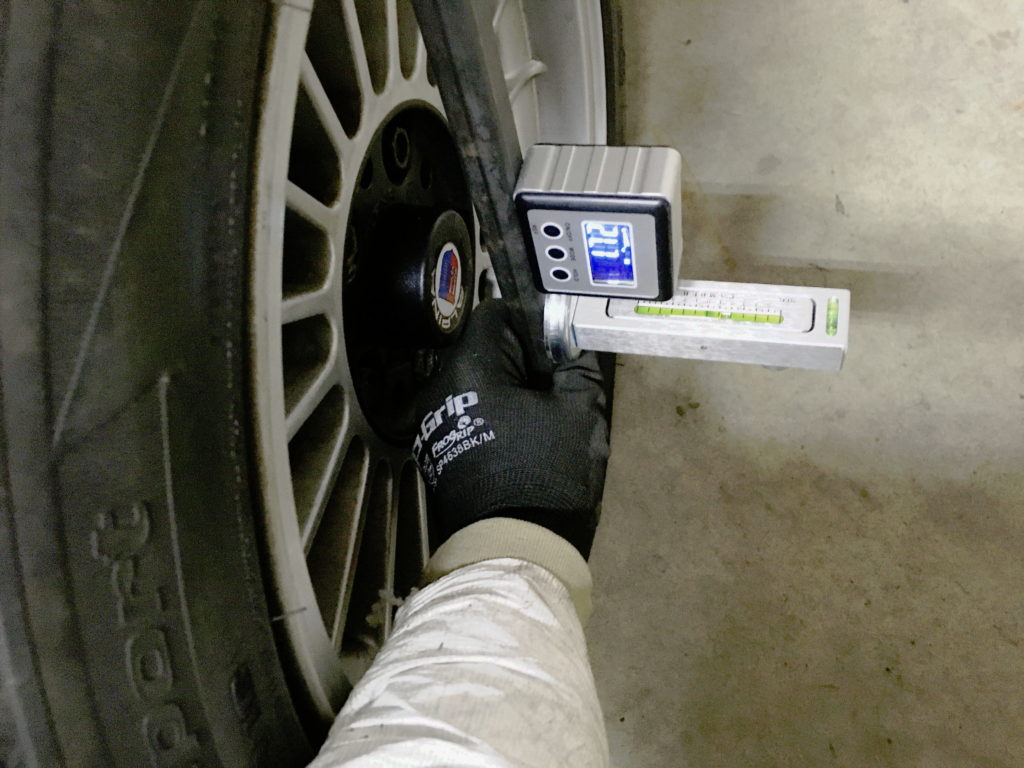
Really, the best you can do is spin the wheel, verify that it’s straight, then cut a straight rigid piece of metal to fit exactly across the outer lips of the wheel. I found that Home Depot sells a three-foot length of 1/2″x1/2″ square metal tube stock for less than ten bucks. Eventually I got good at sticking both gauges to the metal bar and taking both readings simultaneously.
It took awhile, but after taking a series of careful measurements, with my car facing both ways in the garage to be certain that I was correctly calibrating out the slope in the floor, I got camber measurements of about -0.8 on the left wheel and about -1.7 on the right.
Finally: data!
So I got my data, and it shows that Rene’s right front wheel is cambered outward by nearly a degree more than the left.
There appear to be two and only two sources of camber plates for the E9. The first is part number CCP2061 for $399 from Ground Control Systems. These look like most other adjustable camber plates: They have two sets of slots—one for camber, the other for caster—at right angles to each other. When you order them, you need to specify coil-spring size and strut diameter, since the company apparently uses the plate components for both E9 and 2002 applications. Ground Control Systems has a very good reputation, but I know that the look of these plates in Rene would drive me crazy; every time I opened the hood and saw them in my car, I’d think they looked completely out of place with everything else in the engine compartment.
Still, if they were $150 instead of $400, they’d already be on their way here.
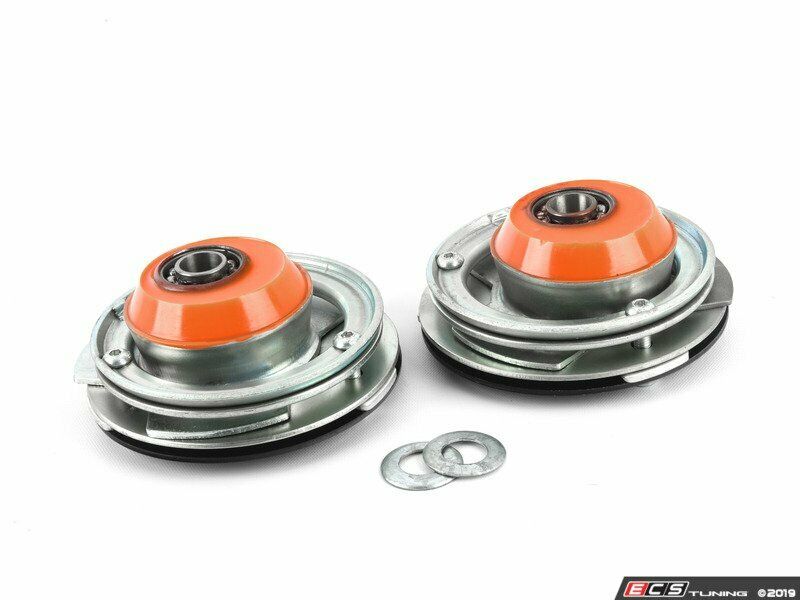
The KMAC adjustable camber plates, available through ECS Tuning: Their photo, unfortunately, shows them upside down.
The other choice is part number 191716-1J from KMAC. The design of these is different from most adjustable camber plates; there aren’t orthogonal camber and caster slots. Rather, curved slotted fittings underneath allow the bushings to move on the mount, and it’s the three standard strut-tower bushing nuts that lock the adjustment down. I assume that a downside of this is that you can’t simply tip the strut sideways to change camber without also changing caster.
As it happens, my good friend Andrew Wilson had a similar uneven-camber issue in his E9 a few years ago, and had VSR1 in Portsmouth, New Hampshire, install a set of KMAC plates. Wilson sent me a photo of the installed plate, and while the orange polyurethane bushing is unfortunate, they look far more at home in a vintage engine compartment than the Ground Control plates would.
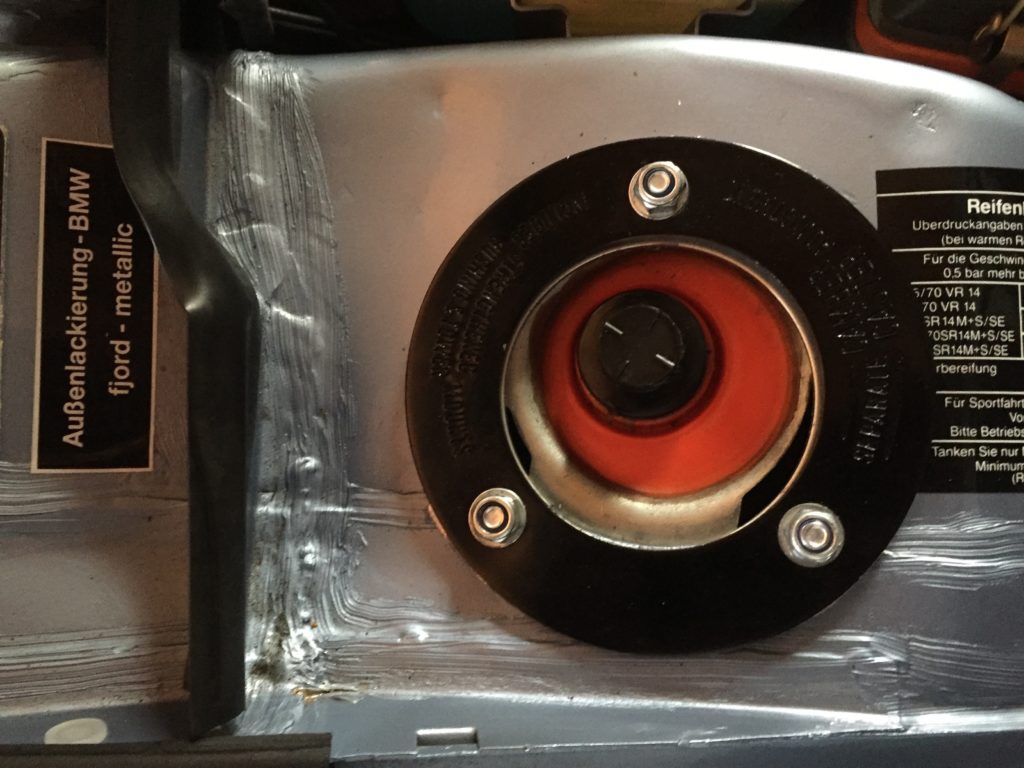
A KMAC adjustable plate installed in Andrew Wilson’s E9. [Photo courtesy Andrew Wilson.]
Rob’s new book, The Best of The Hack Mechanic, is available here on Amazon, as are his seven other books. Signed copies can be ordered directly from Rob here.