In Part I of The Bigger Badder Mouse Warehouse, I regaled and disgusted you with the story of my buying my old work truck from the company that employed me for decades. The truck, a 2008 Chevy Silverado 3500HD duallie with the Duramax diesel, Allison six-speed automatic, a utility body, and an astonishingly low 28,000 miles on the clock, was a bonafide steal—except, that is, for the fact that it smelled like a rodent laboratory where all the technicians had quit and the key to the building had been lost.
Last week I stepped through removing the headliner, finding near-apocalyptic levels of filth in the form of piles of turds and desiccated mouse bodies, and installing a replacement headliner. This week I’m going to talk about dealing with the other mother lode of rodentia: the heater box.
The issues with mouse contamination in the heater box actually pre-dated the problems in the headliner, but having bits of wool fly out whenever I turned on the blower was initially little more than a minor annoyance. Then, two years ago, when I borrowed the truck in order to tow Hampton, the 48,000-mile ’73 2002, I became aware that the smell from the heater box was so strong that I couldn’t really use the a/c or heat at all.
After replacing the headliner, I found that I could enter the cab of the truck without gagging from the stench, but if the truck had been sitting closed up for a few days, I could tell, even without running the blower, that there was still something rotten in the state of Denmark, so to speak. (Note: All the cool mechanics are now going to begin inexplicably referring to heater boxes as “Denmark.” History will note that it all began right here.)
Of course, being a 2002 guy, I am intimately familiar with heater-box contamination issues. I vividly recall buying a ’74 tii decades ago in the dead of winter, turning on the heat while driving it home, and immediately having to roll down the windows due to the howling stench that poured out the vents. Removing the heater box in a 2002 isn’t a difficult job, but it is tedious, and it’s what needs to be done—because in addition to removing whatever mouse nest and physical mouse remains are inside, every interior surface typically needs to be scrubbed. Once, after removing and disassembling a heater box and disposing of the nest inside, I carried the box into the kitchen to wash it in the sink, and my wife immediately said “Ugh! What died?”
The problem is that, among the many ways a 2008 Chevy Silverado 3500HD is not a 2002, is that in the truck, the heater box is a giant three-foot-long climate-control box (that is, it contains both the heater and the evaporator core), and it can’t be removed without first removing the dash. Web searching revealed that this is estimated as a ten-hour job, and I simply wasn’t willing to do it. This is, after all, a truck, not some precious rescued barn-find M1 or long-hood 911S or split-window ’63 Corvette.
However, while web-searching, I discovered that I was not the only one who didn’t want to pull the dash in order to pull the heater box, and found several videos showing creative hacks for slicing open the heater box to replace the evaporator core. While that wasn’t my specific problem, it made me wonder: If I could figure out where the mouse nest was, could I perform the equivalent of arthroscopic surgery—slice open the box in situ and pull out the nest?
The first step was to get an inspection camera. I ordered this $30 camera on Amazon that Wi-Fi-connects to your phone, and was delighted with how well it worked. It took a lot of trial and error to snake it down the defroster vent and maneuver it past the door that’s opened by the actuator, but eventually I was face-to-face with the mouse nest.
Gotcha!
The problem was that, although I could see the nest on the inspection camera, I couldn’t tell where it was from outside the heater box; I didn’t have a reference point. I searched online and could not find a photo of the disassembled heater box. So I had an idea: I could buy another heater box and use it as a reference. I could take it apart, see where this cavity beneath the defroster flap was, see what part of the exterior of the box it was behind, and use that knowledge to drill a hole. And if for some reason I wasn’t able to de-stink my box, well, this would even give me a whole ‘nother box I could, if need be, freshen up and install.
To my delight, I found a nearly-identical heater box on eBay from a 2010 Silverado for only $90, with $30 shipping. It was described as “complete, assumed good but not tested, no returns.” Perfect. The seller misjudged the cost of shipping, so by the time I was done, I had to pony up a total of $160, but hey: If it prevented me from needing to remove the dashboard, that’s short money.
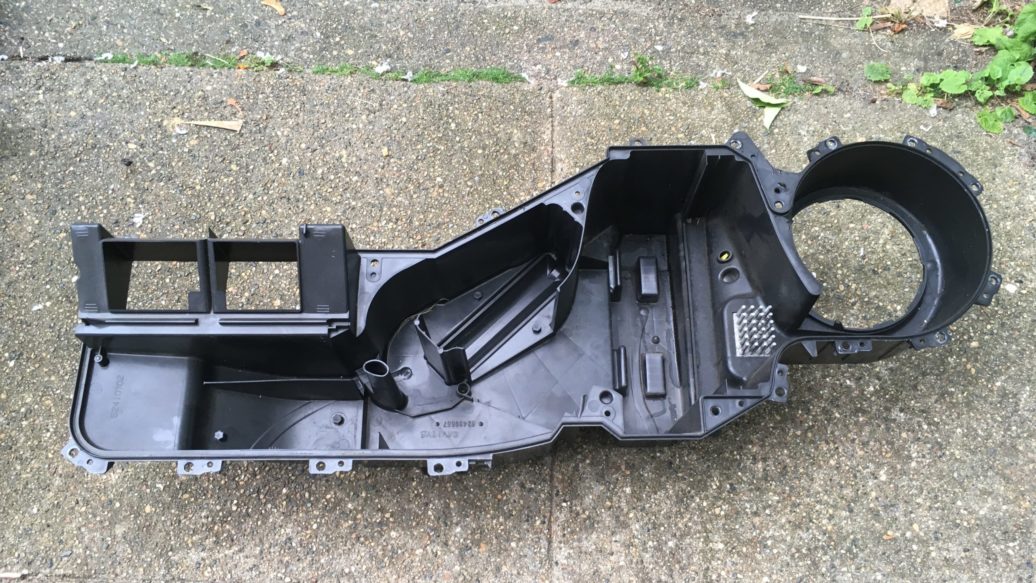
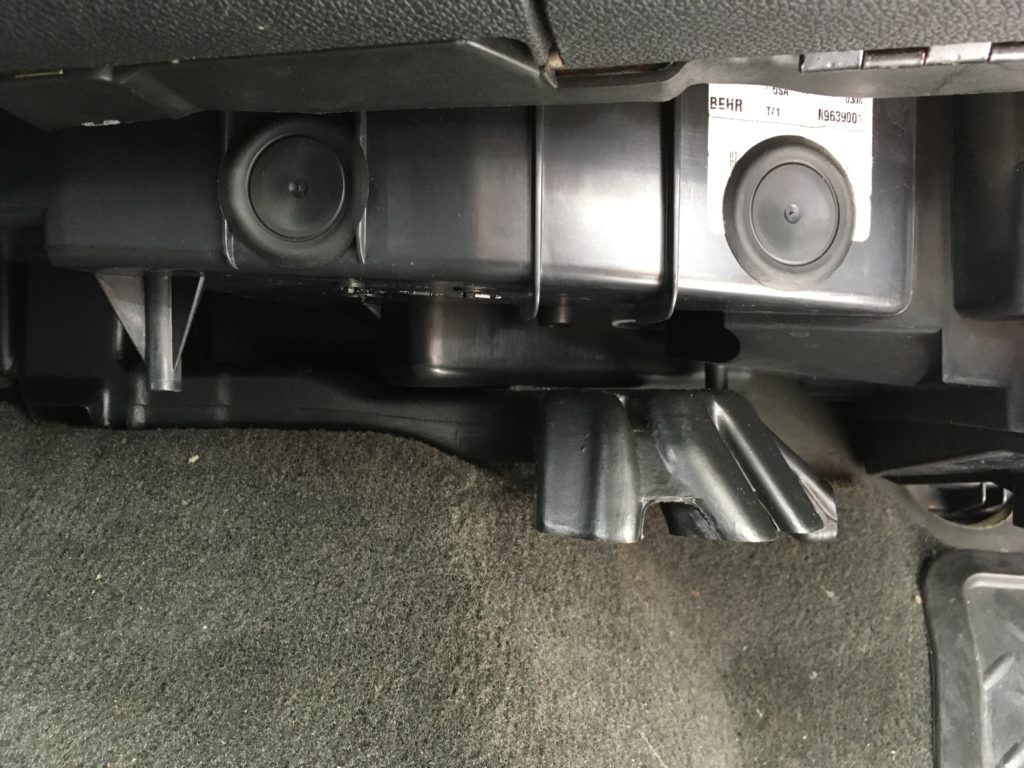
About a week later the box arrived. Like every other heater box I’ve seen, it had a clamshell design with top and bottom halves, and like a 2002 heater box, the halves were riveted together. But this one used plastic rivets that were melted in place. I drilled them out and separated the halves.
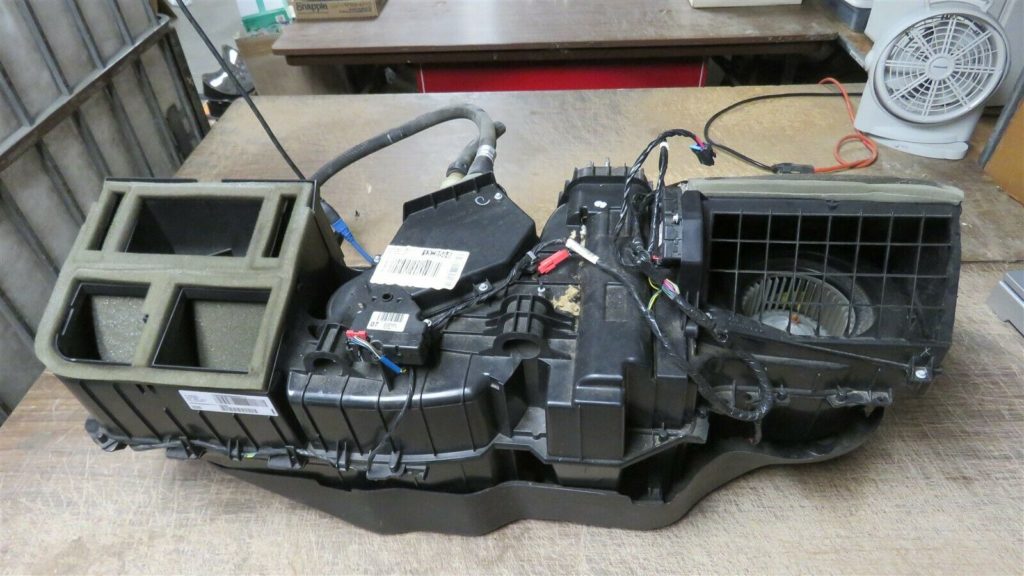
My $160 “reference” heater box.
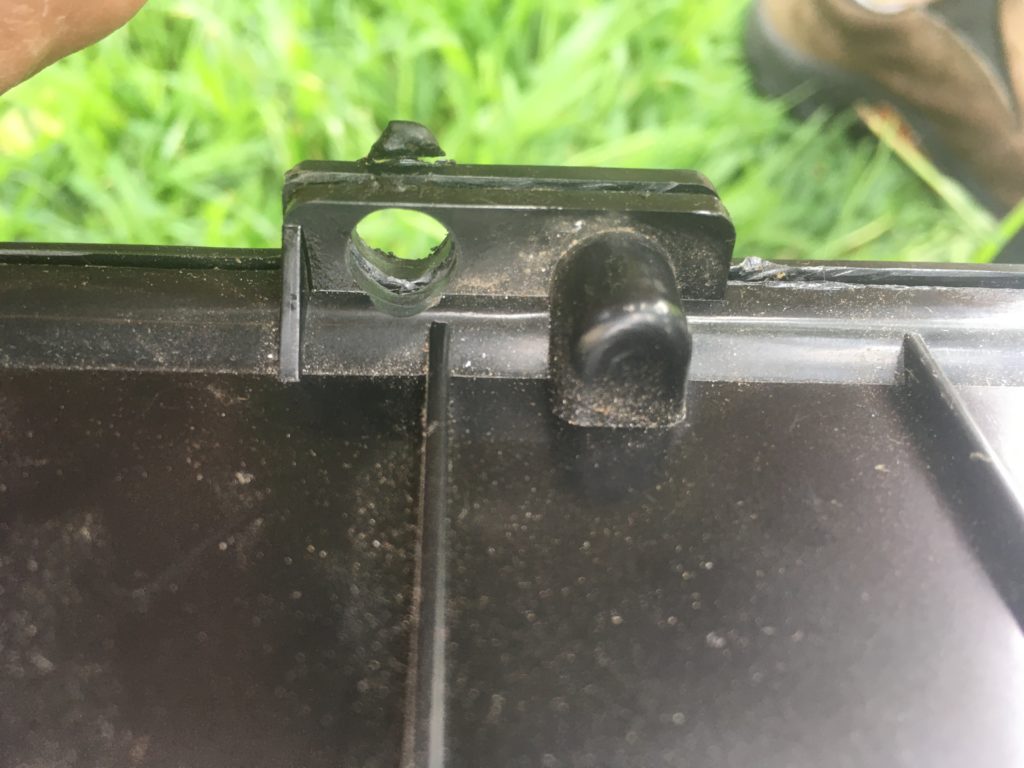
One of the plastic rivets after drilling.
With the box split open, I could see that the bottom half (the base) had a curved ramp area directly beneath the flaps. To the right of that was the heater core and its blend door, and further right was the evaporator core. I determined that I’d likely snaked the inspection camera into the area behind the heater core and facing the interior of the cab. On the outside of the box, this was a simple flat area that I could drill into with a hole saw and not hit any cores, flaps, or actuators; I also saw that the floor of the base stepped downward as it went to the right to allow any liquid to flow out the drain behind the evaporator. This would be crucial later.
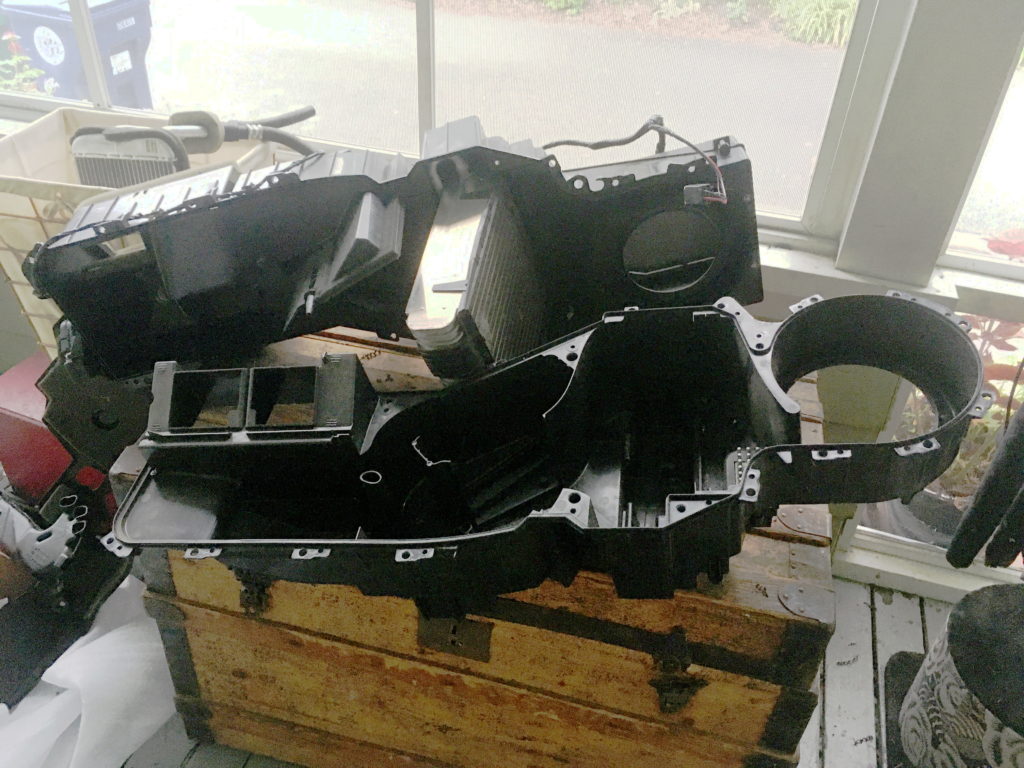
The split heater box.
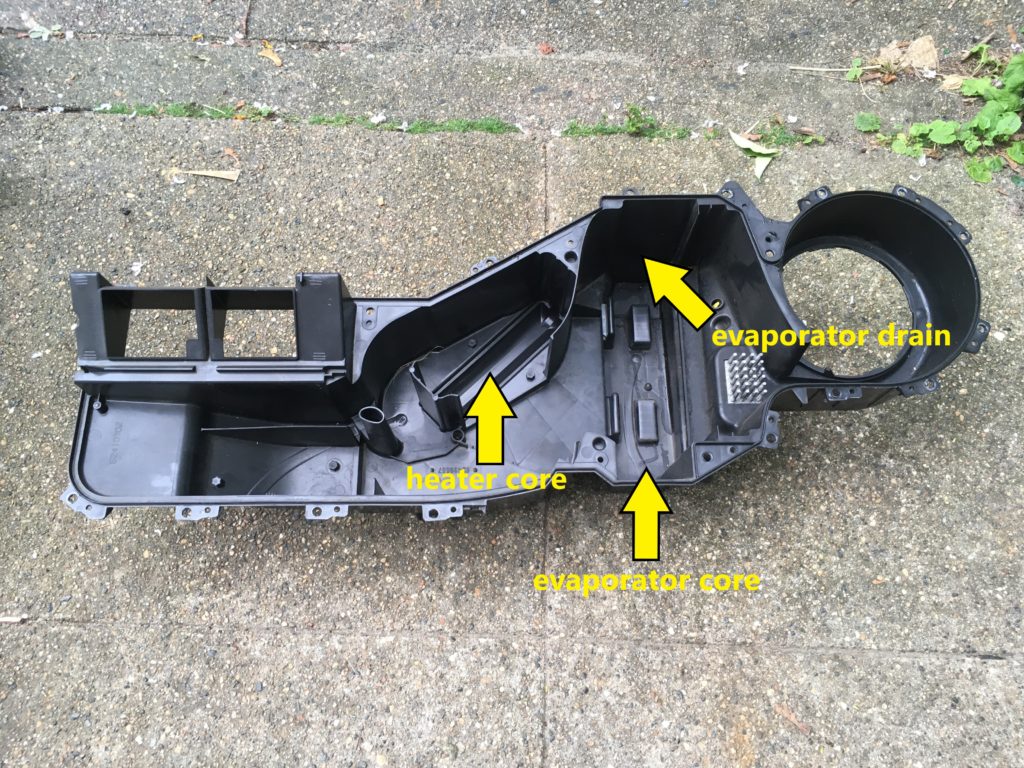
Getting to the point where I had this understanding was $160 well spent.
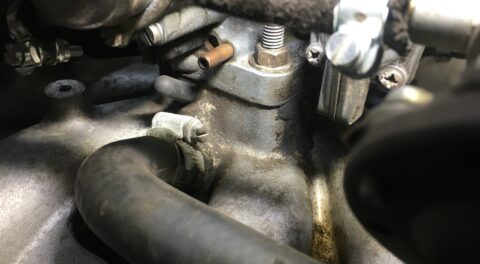
So I took some measurements of the reference box, marked the location on the heater box in the truck, put a 1-1/4″ hole saw on a cordless drill, and held my breath (you know, because of the stench).
I drilled right into the nest.
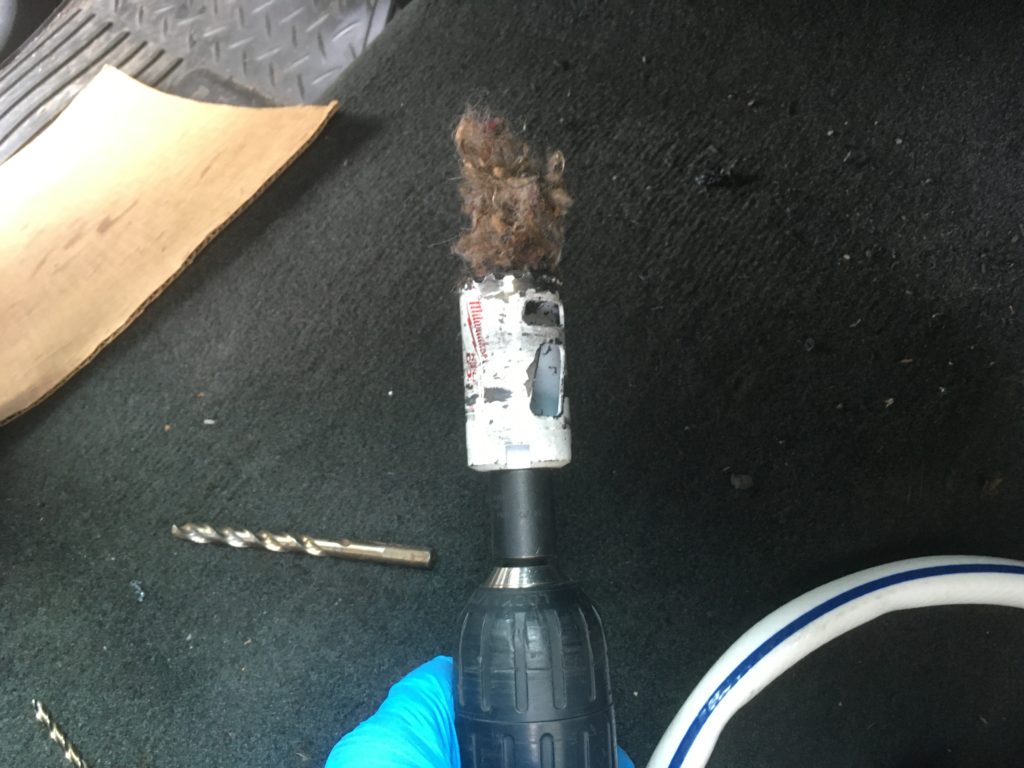
That’s an actual mouse-nest core sample.

Bingo.
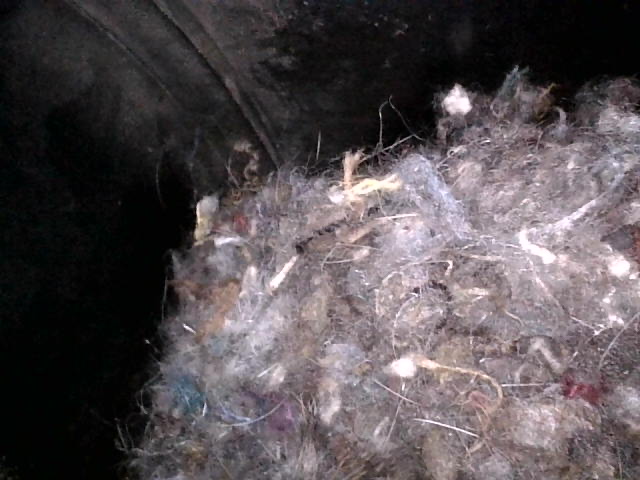
Having done this, I thought that I could just position the hose of my shop vac and suck the nest out, but the nest was larger, stiffer, and more entrenched than I expected. Using my gloved fingers and a pair of long tweezers, I kept pulling out nesting materials. I chased the nest to the right, drilling another hole and continuing the process. So I was neither as laser-accurate nor as lucky as I thought; I could’ve drilled anywhere in the flat part of the front of the base and hit the nest. Still, alternating fingers, tweezers, and the inspection camera, I pulled out all the junk I could see. Its volume was about 2/3 the size of a Kleenex box.
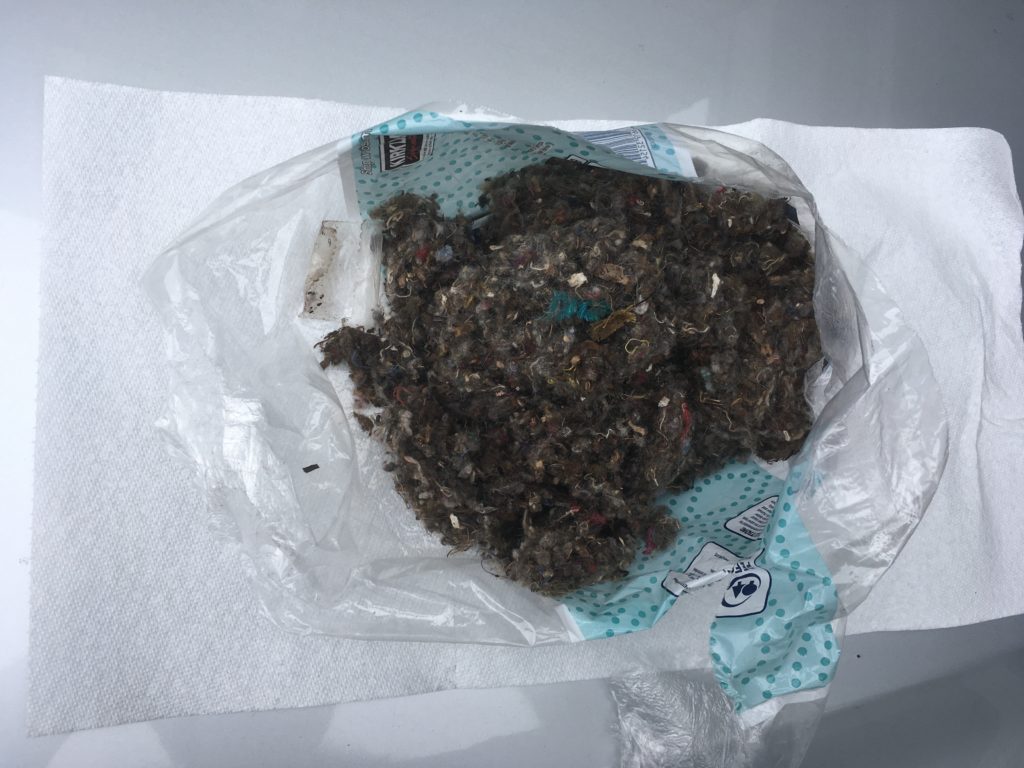
Perhaps not as spectacularly disgusting as the headliner, but still quite substantial.
With the mother lode of nesting material removed, I looked again with the camera, and could see mouse-turd deposits on the floor of the box as well as on the evaporator core. The 1-1/4″ hole was far too small to get a vacuum hose inside, but by duct-taping a section of flexible garden hose onto the end of the shop vac hose I was able to do a credible job sucking them out.
This was never going to be as effective as removing, disassembling, and cleaning the box, but it’s what I could do.
I then searched again with the inspection camera, this time looking back up the flaps, and saw what looked like… feet. And a tail.
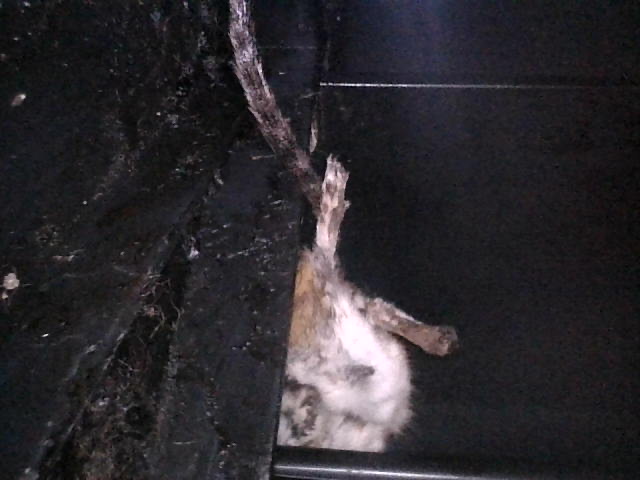
Wait a minute…
Fortunately, it was close enough that I could reach in and grab it. The big tweezers couldn’t get a good enough grip on it, but the extra-long needle-nose pliers could. Man, that was one useful inspection camera!
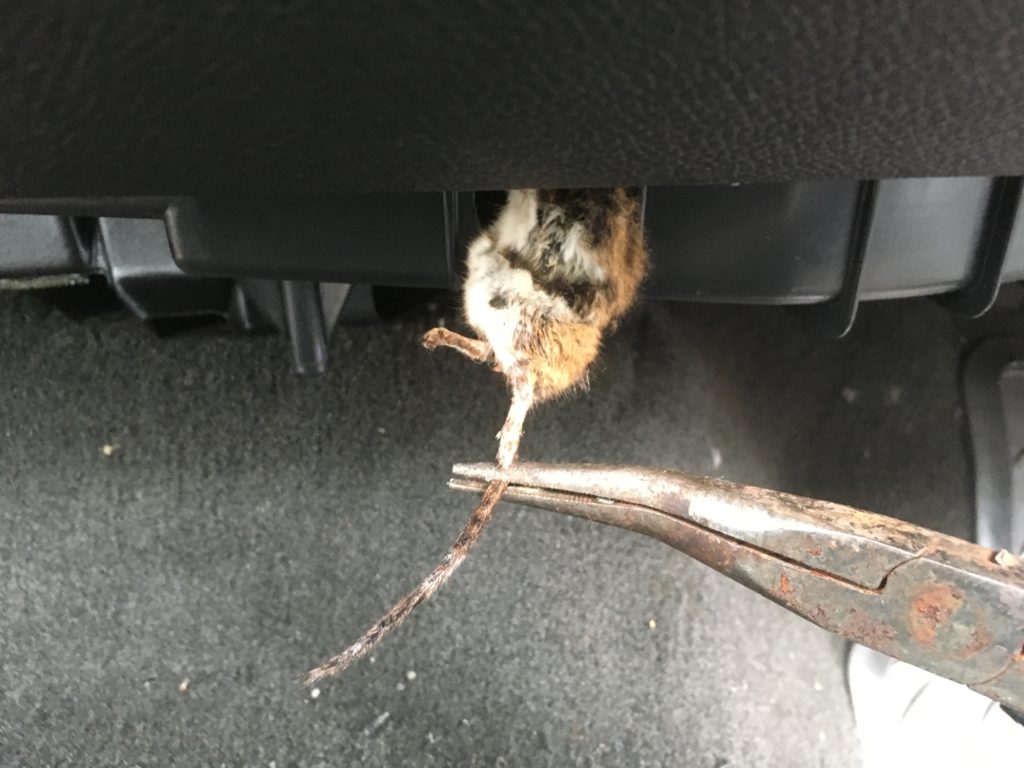
Voilà! As my wife deadpanned, “The mother lode AND the mother.”
With the nest and body-extraction phase of the project hopefully complete, the next task was to try to clean off as much of the poo and goo that was almost certain to be coating the base of the heater box. Since I’d drilled two 1-1/4″ holes, I had easy access to spray in both cleaner and water. I first sprayed a test shot of water just to verify that it did in fact run downhill and out the (apparently unclogged) evaporator drain in the firewall. I then inundated the box with the enzyme-based cleaner, let it sit for an hour, then blasted it with the garden hose and the spray nozzle, repeating the process several times and watching the outflow as it changed from carrying actual turds as flotsam, to light brown, to clear. I then switched from the enzyme cleaner to foaming evaporator cleaner; when I could see no more turds with the inspection camera, I stopped.
With a heart full of trepidation, I put on a mask, started the truck, and turned on the blower fan. And I smelled… nothing.
I took the mask off. Still nothing.
Wow.
With the stench beast apparently slain, I turned on the a/c (which I hadn’t used since the box began stinking)—and found that it didn’t work. I connected my manifold gauge set and saw that the system had pressure, indicating that it had some amount of refrigerant in it, but the compressor was short-cycling (rapidly switching on and off). This is the textbook symptom of a system that’s low on refrigerant.
I checked the hood sticker and found that the truck’s a/c takes only 1.7 pounds (27 ounces) of R134a. I shot in two twelve-ounce cans, and by the end of the second can, it came up cold. Yeah, I know, it never “just needs a recharge,” but you have to start somewhere.
So holy crap (or holy crap be gone)! I have not only a stink-free truck, but a stink-free air-conditioned truck.
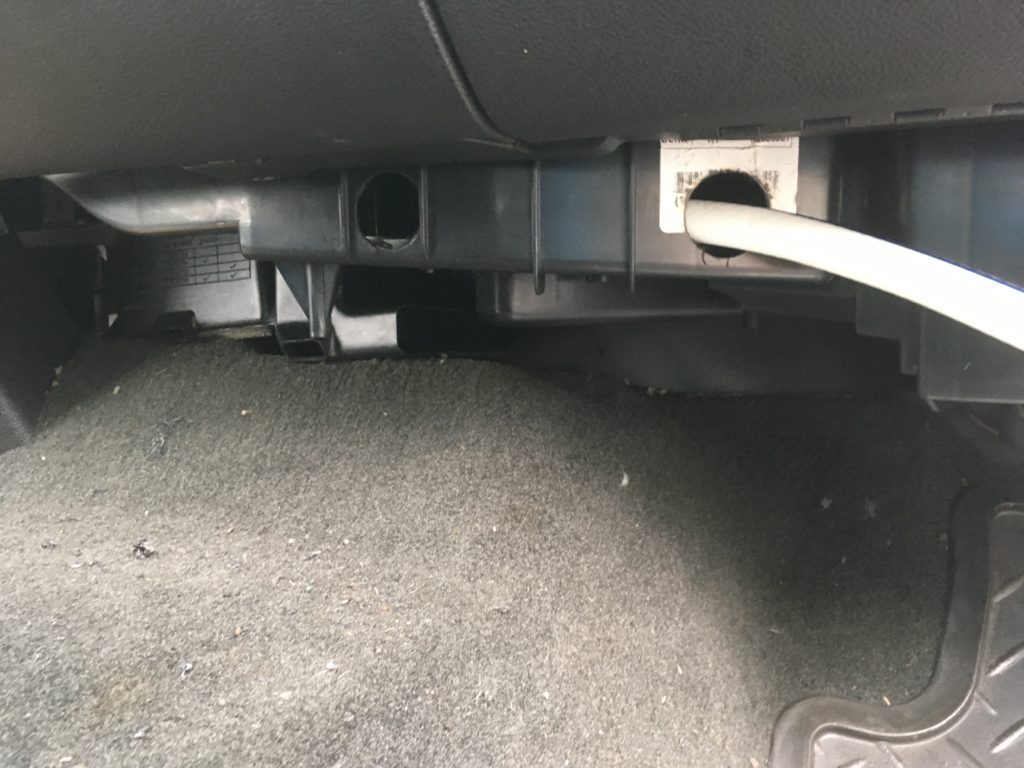
I then ordered some 1-1/4″ rubber panel plugs for the holes I’d drilled and closed things up.
I just call them aftermarket factory access holes. And yes, the Silverado’s heater box is made by Behr, just like on a BMW.
Finally, I bought one of those inexpensive Enerzen ozone generators you see on Amazon (actually, I found an open-box one even cheaper on eBay) and ran it for several hours in the closed-up truck. Since I’d already taken the smell down to a nearly undetectable level, I can’t really say what the ozone generator did, but afterward I used it in my Z3, which had a persistent smell of cigarettes from the son of the previous owner, and it knocked that right out.
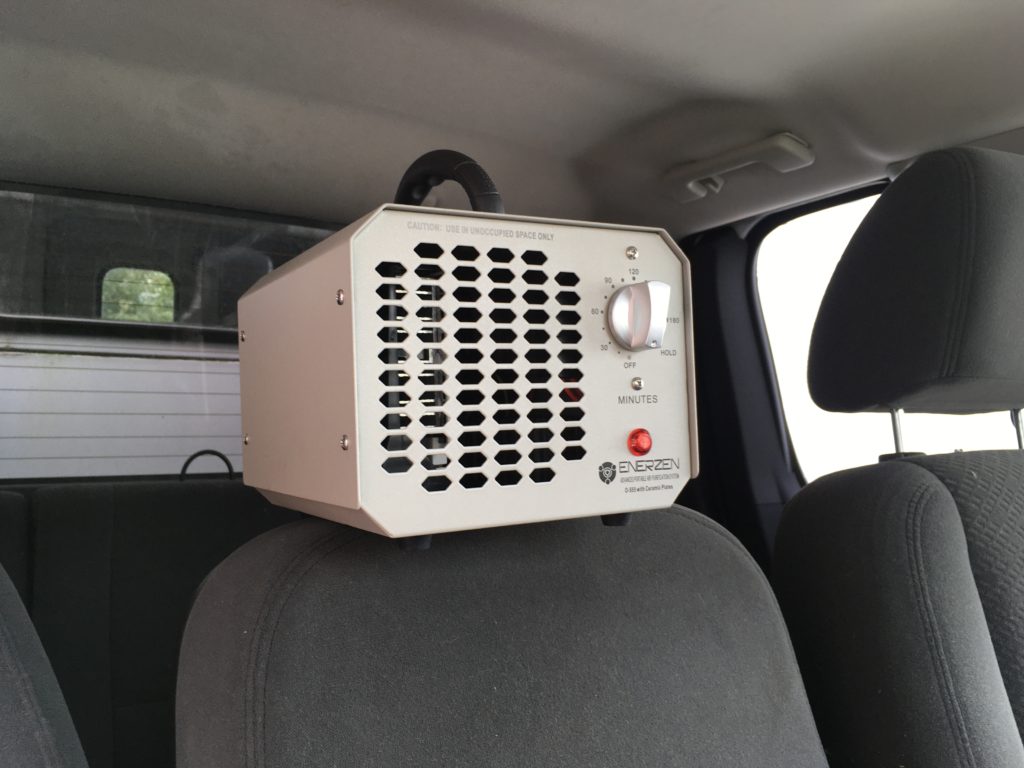
The finishing touch.
It rained for the next few days, so the truck sat with the windows up. When I next drove it and ran the blower motor, some of the rodent smell was back. It was by no means overpowering, and was rendered completely livable simply by my wearing a mask, but it was a reality check that not removing, disassembling, and directly cleaning the heater box may have the consequence of the need for repeated and regular cleaning and flushing. The removable rubber plugs in the heater box make this trivial to do. Still, as I said earlier, to me this is success. If I didn’t cure it and instead this is more like a chronic condition that I need to continue to treat, that’s fine with me.
We’ll see what the future of the no-longer mouse-infested truck is. It’s really waaaaaay more truck than I need to own if all I want to do is occasionally tow a car or snag some Recaro seats, wheels, and a five-speed. I’d probably be better served by selling it and buying something smaller. And of course if I bought it primarily to have something to use to drag a car home the next time a crime of opportunity like Hampton knocks on my door, the joke is that with all the cars, the RV, and now the truck, the long side of my driveway—the side that used to endlessly swallow the cars not queued up in front of the garage—is now completely full.
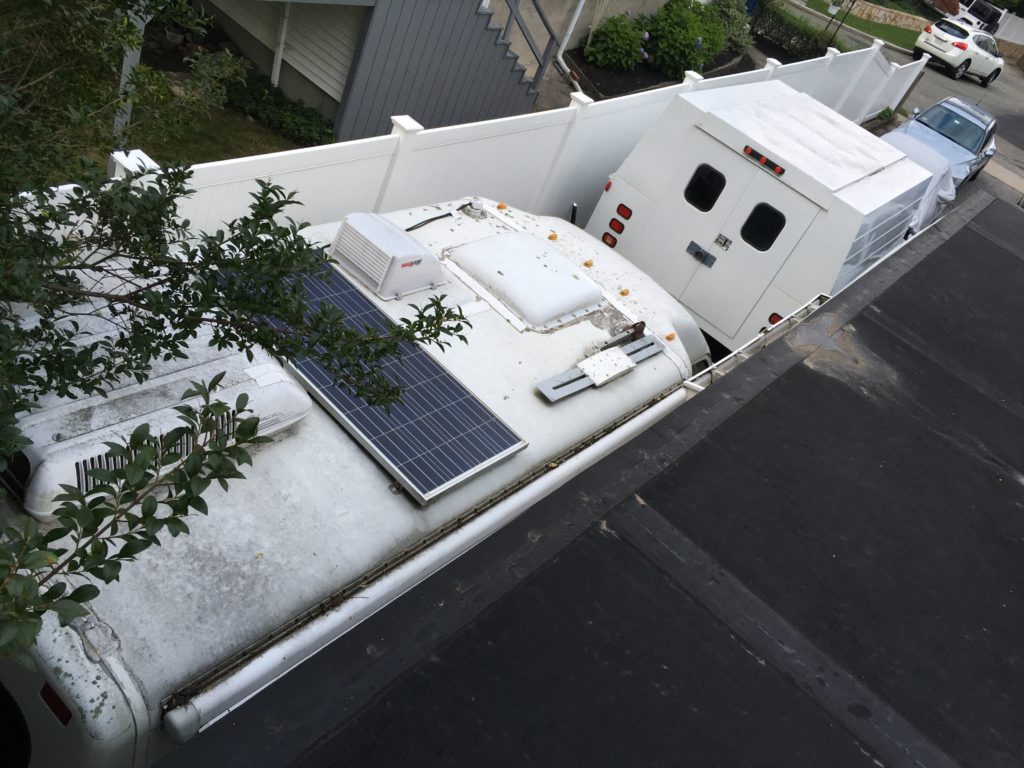
That’s the Z3 under the cover, with the M coupe in front of it.
Hey, I know! If I sell a car, I can now quote delivery!—Rob Siegel
Rob’s new book, The Best of The Hack Mechanic, is available here on Amazon, as are his seven other books. Signed copies can be ordered directly from Rob here.