Nearly 30 years ago, I wrote a column for Roundel Magazine titled “The Good Kluge.” In it, I made the case that a “kluge” (pronounce klooj)—a repair or a part that’s different than what the manufacturer intended—was a good one if it: a) Fixed the problem; b) Saved money; c) Was safe, and d) Was easily undone.
I just performed what I regard as a very good kluge on my Euro ’79 635CSi.
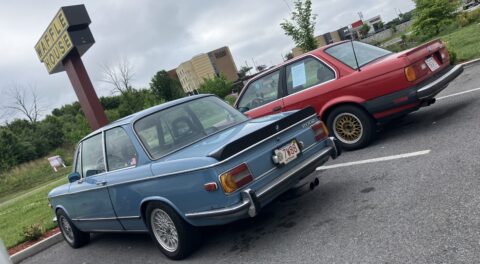
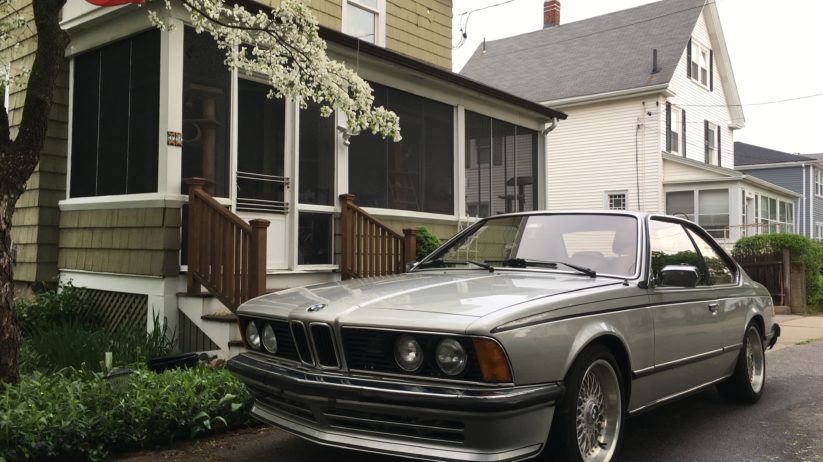
The car has seen very little action since I drove it to the Vintage and back in 2018. I absolutely love the look of this car with its Euro bumpers, Polaris paint, and factory black stripes. And, of all of my 1970s-era BMWs, the shark is hands-down the best road-trip car—quiet, completely planted at speeds above 80 mph where the other cars start to get a little light in the nose.
But around town, it just doesn’t have the kind of snap to it that the smaller cars (the 2002s, the 3.0CSi, the Bavaria, and the Z3 M Coupe) have. So, without roadtrips on the agenda, it’s been sitting out in one of the spaces I rent in Fitchburg. I give it a run around town every few months, but very little other time or attention.
Last week, I thought I’d bring the car home and decide whether it’s time to perhaps move it along. My wife Maire Anne had been jittery about my doing solo trips back and forth to Fitchburg during the coronavirus pandemic, fearful of me being in a breakdown where I don’t have control over social distance, but she’s acclimated somewhat to the situation. So last Sunday, out I went to Fitchburg in Louie the ’72 2002tii to swap him for Sharkie.
I rolled up the garage door, uncovered the big menacing E24, and immediately saw that its inspection sticker had expired in December. Geez, I thought, had I known that, I would’ve preferred to run the car back to Newton under cover of darkness. There is an inspection station not far from the Fitchburg garage, but and they’re not open Sunday. I risked the ticket and drove the car back to Newton, mercifully without incident.
When I got the car home, I thought I’d prepare for a Monday inspection by verifying that the necessary systems (lights, wipers, horn, etc) worked for inspection, and immediately found that there were two problems. The first was a familiar issue on this car—neither of the front directionals were working. I’d wrestled with this before. In the past, it appeared to be a grounding or a contact issue that could be solved temporarily by re-seating the connector or the bulb. But the second issue was something new—the left low beam light was dead.
As I waded into the problems, I found something surprising—fuse #10 was blown. According to the wiring diagram, this fuse is only for the left front and rear directional. I replaced it, and found that it blew again as soon as the left directional was activated. The really odd thing was that it did so even when the engine was off and the key was out of the ignition, and even when the flasher relay was removed. Clearly something was shorting to ground.
Now, this is a Euro car, and as was the case with other 1970s-era BMWs, the European version didn’t have front parking lights integrated into the directionals. That is, the bulbs in the European front corner light assemblies were single-filament bulbs for the directionals only. In order to have the front corner light assemblies do double duty as both directionals and parking lights, they either need two-filament bulbs, or an additional bulb. I looked in RealOEM and verified that the U.S.-spec version of the car (a 633CSi) does indeed have two bulbs. This was odd, because I had no memory of the assembly in my car having a second bulb. So how the hell did I have front directionals and front parking lights?
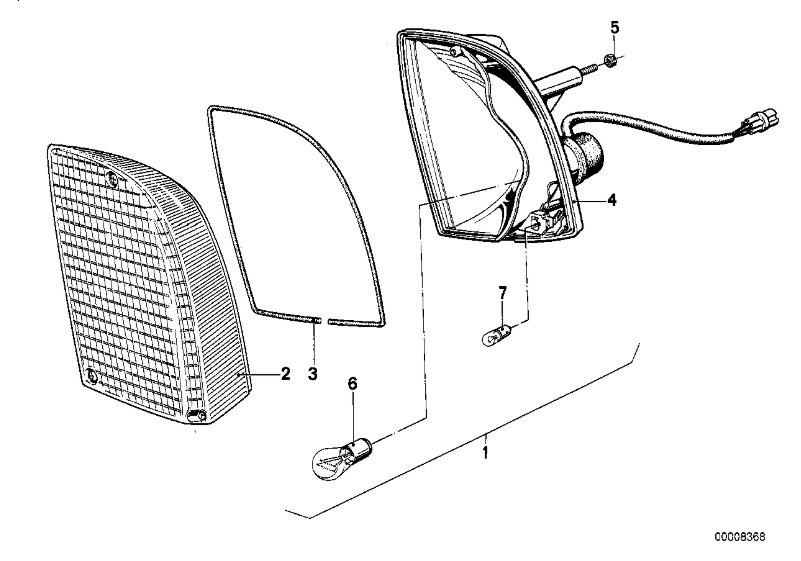
The diagram from Realowm showing two bulbs for a Federal-spec 633CSi.
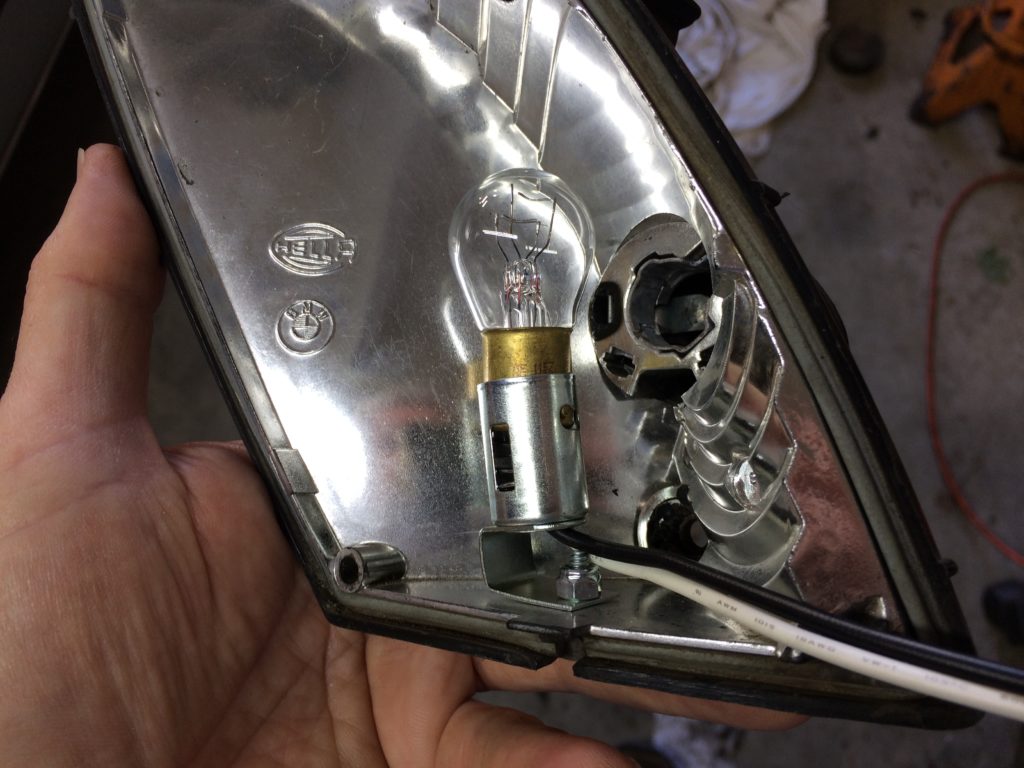
I pulled the outer cover off the driver’s side assembly and saw something that’s not supposed to be there—a single two-filament bulb. I looked behind the assembly at the wiring in the nose. There was the pigtail with the round multi-pin connector shown in the diagram above (it contains the wire for the directional and also the ground wire; note that on a 2002 there’s no ground wire because the bulb’s socket assembly grounds directly to the fender). But there was also a single yellow wire heading into the back of the assembly. When I traced the other end, it vanished into a bundle of electrical tape. Ick.
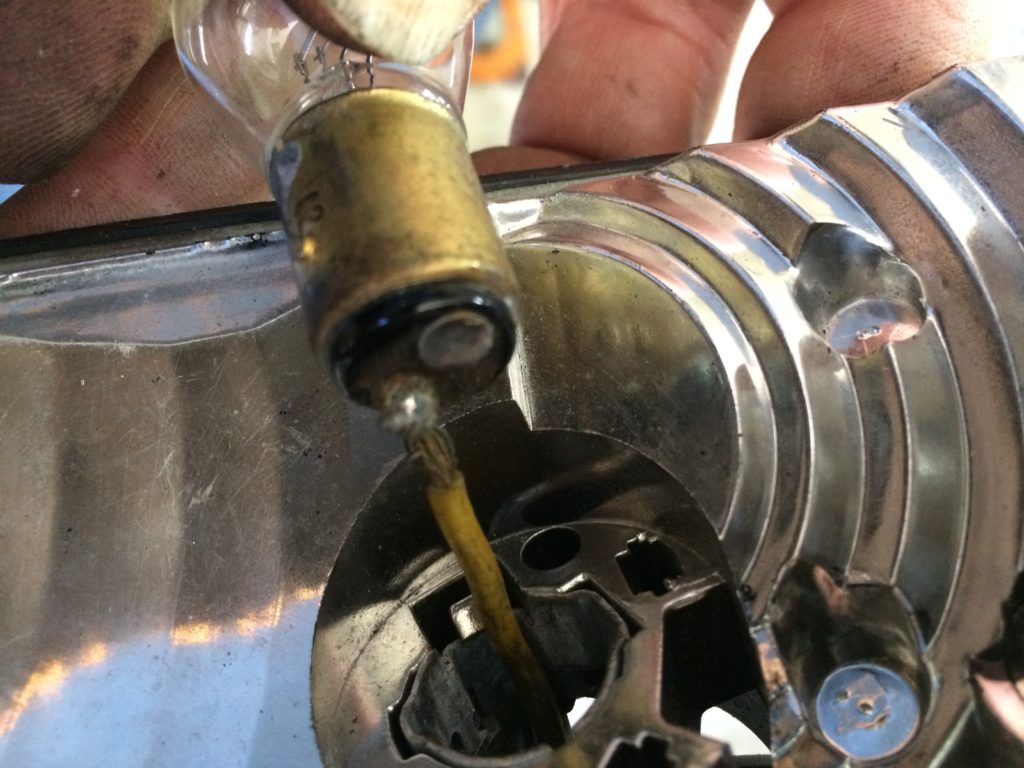
I twisted the bulb out of its socket and encountered resistance when I pulled it forward. And then I saw, understood, and laughed out loud.
The yellow wire was literally soldered to the bottom of the bulb.
What the…?
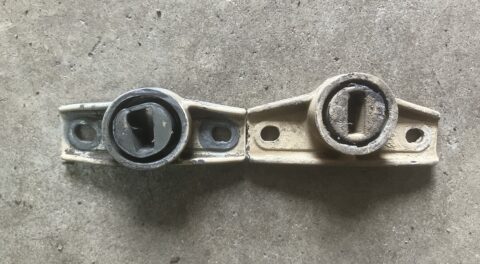
In order to see what I was dealing with and address it, I pulled one of the corner light assemblies out. This is a pain in the butt, as they’re held on by two little nuts on threaded posts, and on the driver’s side assembly, the posts had broken off and a previous owner had replaced them with bolts, the heads of which need to be immobilized, and that’s challenging because they’re in recessed sockets. But I removed it and sized up the situation.
In the photo below, you can see that the socket has two wires (blue and brown) meant for a single-filament bulb (signal and ground for the directional), but that socket was holding a two-filament bulb. It turned out that it worked because the tab for the blue wire for the directional was making contact to one of the filaments, even though it wasn’t in the center of the bottom of the bulb like it would be for a single-filament bulb. In the photo above you can see that that contact on the bottom of the bulb is actually worn away. Because of that, it was making poor contact, which is certainly why it had been intermittent for all these years. The yellow wire is the one that’s soldered in place for the parking light.
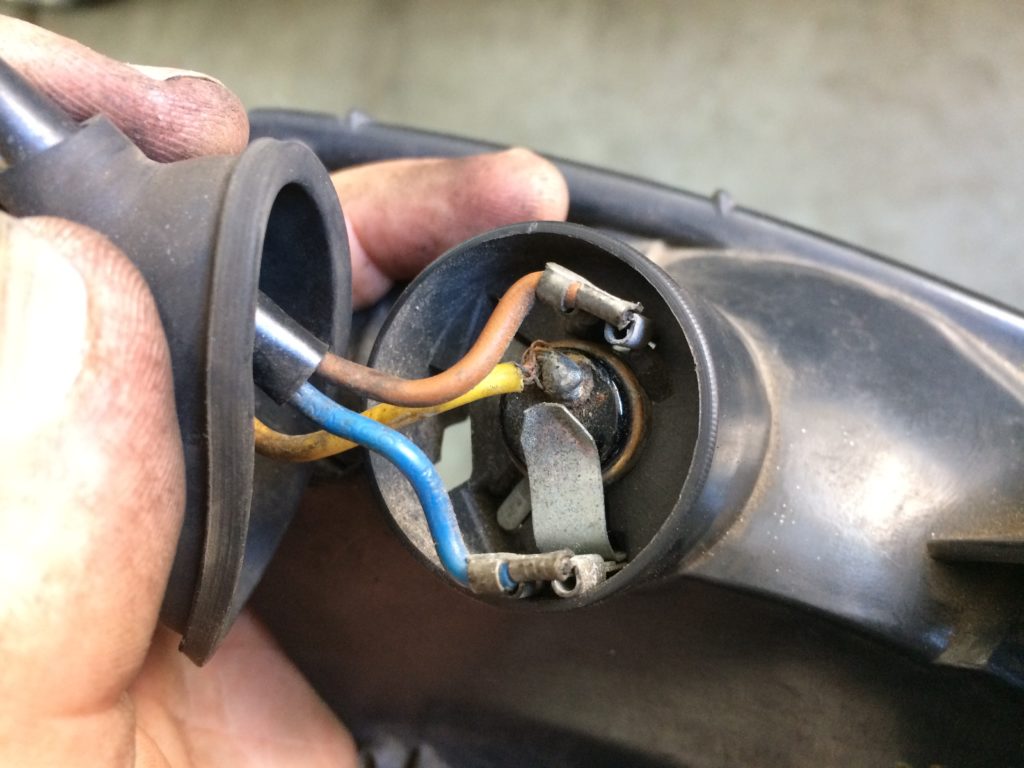
The two-filament bulb in a single-filament socket.
Okay. I completely agree that soldering a wire to the bottom of a light is a total booge. But why was it blowing fuses, and how do I fix it? To answer these questions, it necessitated that I go into the wiring for the headlights.
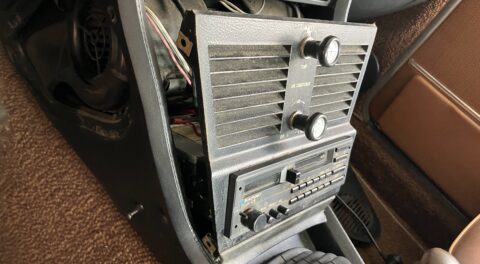
When I bought the Euro 635CSi, there were several odd things about it. It had several issues that prevented it from being driven far, such as a leaky gas tank and non-functioning wipers, but the previous owner had sprung for bling such as refinished BBS RA wheels, an Alpina steering wheel, an Optima battery, and HID headlamps. To hold down the purchase price, I negotiated that he keep the first three. And I really didn’t give a hoot about the HIDs one way or the other. After I took possession of the car, I found that the HIDs had been hastily adapted, with wires wrapped in electrical tape and with the transformer boxes completely unsecured and banging around. I zip-tied them to the nose and left the rest alone. Until now.
Looking at the wiring, I could see that the yellow wire that powered the parking lights was coming from the jumble of HID-adapted wires. Since the left HID was dead, and since something was shorting out the directionals, I decided to pull out the HIDs and their electrical-taped wiring.
What I found was that, on the original standard three-connector headlight plugs, one the wires leading to the plugs had been spliced into to power the yellow wire that was soldered to the bulbs for the parking lights, and that, on the right side of the car, one of those wires had the insulation rubbed off and was touching ground. I also found that the transformer box for the HIDs had two male spade connectors that had been plugged into two of the three female spade sockets on the three-connector plug, except on one side where the spade had popped out of the original plastic connector and thus was wrapped in electrical tape instead. It was a wonder that it had worked for as long as it had. I pulled it all out and replaced the HIDs with a set of inexpensive Wagner sealed beams with a standard three-prong connector on the back. In the spade that gad popped out, I pushed the three-prong connectors onto the back of the bulbs, and verified that I now had working low and high beams for inspection.
The arrow points to the rubbed-off insulation that was causing the fuse to blow.
I then went on to address how to make the light assemblies work correctly. I seemed to have four choices. I could live with the existing kluge and repair the intermittent contact at the non-soldered terminal by simply soldering on new bulbs whose terminals weren’t worn down so flat. Or I could buy a pair of U.S.-spec corner assemblies that had two bulbs and wire them in. The price for the handful of sets of new old stock ones in Latvia was about $150 per side on eBay. Used pairs were as low as $100, but appeared to be in poor condition. Alternatively, if the goal was simply to get it through inspection, I thought that I could simply insert a small LED bulb, slide the wires out the back, tape in place, and wire it to the yellow parking light wire and ground.
But then I had another idea. The form factor for this kind of bayonet twist-lock socket is a standard called “BA15D.” I found that a variety of sockets are readily available through Amazon and other vendors. You can select sockets for one and two-filament bulbs that mount in a variety of ways. When I found this two-filament socket, with a flush base mount that could be held in place with a single screw, I bought two of them. I drilled one small hole in the bottom of each assembly, put in a small screw and nut to hold the socket, and adapted the wiring so if anyone wants to go back to using the original integrated single-filament socket, they still can.
The surface-mount BA15D bayonet socket. The two wires are for the two filaments (turn signal and parking light) in the bulb. Not pictured is a third wire with a ring terminal I attached to the nut at the base for the ground connection.
I wired it up, using the white wire for the directional, the black one for the parking light, and making a short adapter with a ring terminal in it to ground the base. Initially it didn’t work, but I traced the problem to a corroded ground pin in the round connector. Once I fixed it, everything—headlights, parking lights, and directionals—began working.
But then, when I was putting the car through its paces prior to inspection, I noticed something very odd: If, with the key off or out, I flipped the directional, the rear tail light, the front parking light, and the low beam headlight on that side came on. It didn’t do this if the key was turned to accessories or run; it only did it with the key off or out. Initially I was mystified, and wondered what wires I’d crossed, but then I figured it out.
Many vintage German Euro cars had a feature that allowed you to leave the parking lights on one side of the car on. The idea was that, if you parked the car at night on a skinny street, you’d flick the directional on the street-facing side to make the car easier for other drivers to see. I believe that my E9, which is still wearing its Euro headlights, still has this setup. It includes a little bulb inside the low-beam housing that’s switched on by the directional. These housings must’ve been removed when the HIDs were installed. The three-prong to two-prong HID wiring must’ve bypassed this behavior, but when I connected the three-pronged plug to the back of the conventional Wagner headlights, it began using that 3rd prong to light the filament in the bulb for this purpose. I might lift that terminal out of the three-pronged plug so I don’t accidentally run the battery down, but it’s kind of a cool remnant of the car’s Euro history.
Editor’s Note: Certain modern U.S.-spec BMWs have this feature as well, and it works precisely the same with the turn signal stalk acting as the switch when the key is out.—Alex Tock
So, with the removal of the HID headlamps (one of which was bad), replacement with a pair of conventional Wagners I had kicking around the garage, and “good kluge” of the flush-mount BA15D bayonet sockets, Sharkie passed inspection and is legal again. I’ll spend some time with it and fix a few other things before I decide on its fate.—Rob Siegel
Rob’s most recent book, Resurrecting Bertha: Buying Back Our Wedding Car After 26 Years In Storage, is available on Amazon here. His other books, including Just Needs a Recharge: The Hack MechanicTM Guide to Vintage Air Conditioning, are available here on Amazon. Or you can order personally-inscribed copies of all of his books through Rob’s website: www.robsiegel.com. His new book, The Lotus Chronicles, will be available in the fall.