Currently, I’m making preparations to do a more or less complete rebuild of my Jetta’s suspension and brakes. Given that it’s my daily driver until my Subaru WRX arrives in June, it’s taking precedence over my E34 project, but that’s not a bad thing. I’ll be able to experiment with a few restoration and refinishing techniques on a $695 car, instead of potentially messing up my beloved BMW.
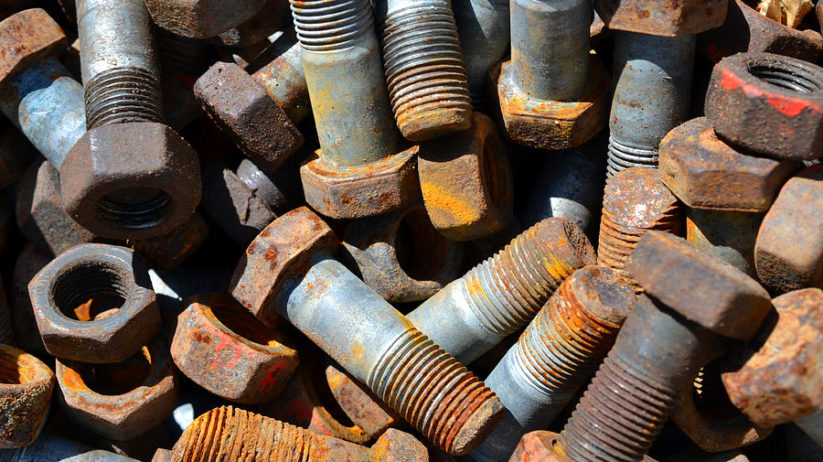
One of my favorite experiences in life is replacing worn-out, rusty components with fresh new parts. But how do you attach those shiny new parts to your car? With the same rusty, worn-out hardware that held on the old parts. Replacing that hardware is expensive at best; impossible at worst. Many of those fasteners are difficult to source, having been discontinued long ago. For some cars I’ve owned, the factory part diagrams don’t even list the hardware.
I’ve struggled with this for years, using wire brushes and spray paint in an attempt to rejuvenate my old bolts, screws, and nuts. I’ve even tried white vinegar, which, while simpler and less labor-intensive than the wire-brush method, produced results that looked good at first but didn’t last. The problem? Most of the hardware on your car is coated (usually with zinc) to prevent corrosion. It lasts quite a while, but when it wears down, rust creeps in. The good new is that there’s a way to replace that protective finish.
The first step will be to effectively knock off the rust and scale, leaving your fasteners as clean and shiny as they were when your car left the factory. To accomplish this, I’ll be buying a vibratory tumbler and some resin media. Place your hardware in the tumbler, fill it with an appropriate amount of the media, turn it on, and wait. After several hours, your parts will be clean and free of rust. Best of all, while the rapid agitating motion of the tumbler is aggressive enough to remove rust, the media is not so aggressive that it will damage threads.
Next, you’ll need a do-it-yourself plating setup. I plan on plating my chassis hardware with zinc, then applying a yellow chromate finish. This will not only to accurately recreate the original finish, but it should also resist rust and corrosion for years to come. Plating kits can be purchased from restoration suppliers like Eastwood or assembled with a selection of hardware-store chemicals and supplies.
Since you’ll be working with chemicals and electricity (admittedly at low voltage), it’s important to execute the process in the proper environment and to exercise caution. Since we all have the good sense to drive BMWs, common sense shouldn’t be a problem. The chemical processes at work are actually quite fascinating, so as I descend further into this rabbit hole, I’ll keep you updated and share more in upcoming articles. Once I have my plating setup together, I’ll keep you posted as I try a couple test pieces from my E34 parts car, followed by the hardware holding my Jetta together.—Cam VanDerHorst
[Photo courtesy Vanessa Ilott]