Last week I described walking through the punch list of things needed to get Louie the 2002 ready for his 900-ish-mile run to the BMW CCA Foundation in Greer, South Carolina, for his participation in the exhibit “The Icon: 50 Years Of The BMW 2002.” It was mostly small stuff—changing the oil and filter, installing a switch to make the fuel injection’s cold-start system function, swapping radiators with my other tii, changing some underhood clamps and fasteners to make the engine compartment look original and correct, replacing a headlight, and fixing the horn. Nothing overly invasive, no last-minute head gaskets or clutches. Headed into this week, there weren’t many things left on the punch list, and none were a big deal.
However, there remained the question of the driver’s seat.
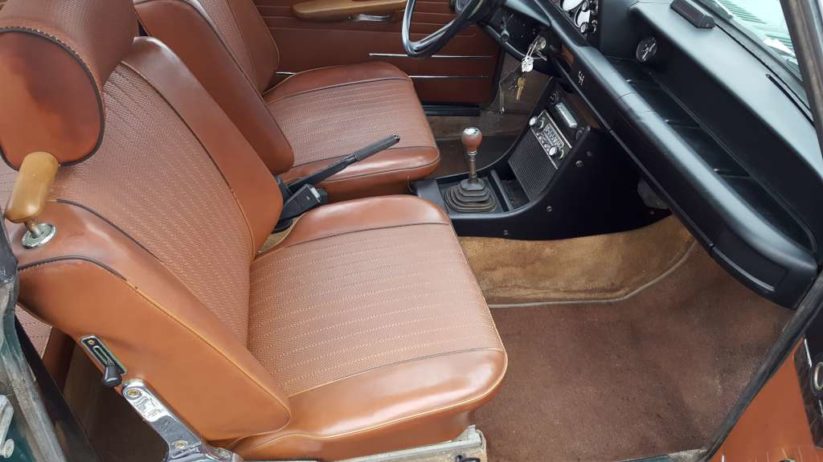
Louie has a remarkably original interior, including original front seats with chrome seat hinges, and no rips or tears exposing springs or horsehair padding. The problem is that original horsehair seats, no matter how pretty and period-correct they look, simply suck in terms of both butt comfort and back support. When I bought Louie a year ago and went down to Louisville to get him running and drive him home, I took with me, along with the other tools and parts in the rented SUV, one of the Konig seats out of my other tii. These are Recaro-like seats that provide oodles of back support, in which I can pound out a thousand pain-free miles in a day if need be. That Konig seat was in Louie for the drive back to Boston—the original driver’s seat was folded up and resting on the back seat—and stayed in the car for the drive last spring to the Vintage and back. The question was whether to leave it there for the drive to the Foundation in a few weeks.
Clearly, if Louie is to be displayed as an original, unmolested survivor tii ,and not your basic Rob Siegel boogered-up “this is how I want this car configured and if you don’t like it you can pound sand” vintage BMW like my 3.0CSi, it should be wearing both of its original seats. I briefly thought about throwing the original seat in the back, driving down in the Konig, swapping seats at the Foundation, and shipping the Konig back—after all, Louie will be down there for nearly a year—but sometimes I seem to have a desire not to make things more complicated than they need to be. So I simply put the original seat back in the car. My Bavaria is still wearing both original front seats, and I deal with the miserably uncomfortable driver’s seat by using two Tempur-Pedic pillows, one behind my back and one under my butt. It works pretty well, except that if you try to do the yee-ha thing around an entrance ramp, it’s like cornering while sitting on a toilet, and you fall off. The tii does look beautiful, though, wearing both original seats again.

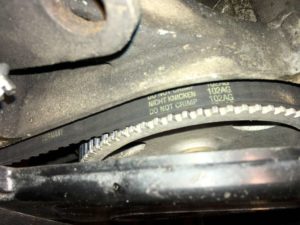
Next were two trivial pieces of prophylactic maintenance: checking the fuel-injection belt and adjusting the valves. On a tii, the Kugelfischer injection pump is driven by a cogged belt off the crankshaft pulley. The belt is protected by a lower and upper plastic cover, which typically lasts for decades—but when it goes, it disintegrates and shreds itself into a heap of rubbery string. Your tii stops pushing fuel to the injectors, the car abruptly dies, and you coast to the side of the road. I’d checked the belt last year in Louisville when I bought the car, but, hey, it’s on the punch list, gotta punch it or risk worrying about it. Four 10-mm bolts, upper cover off, visual inspection of the belt—it’s good. Don’t need to worry about that.
That left valve adjustment. I love adjusting valves. I love the feeling of intimacy with the car, having your hands in its valve train. I love the fact that you can do it better than any professional because it needs to be done with the engine dead cold; if you take the car to a shop, they’ll likely start the car, drive into a service bay when it’s open, and adjust the valves. They’re very unlikely to let it sit in a bay overnight and do it in the morning when it’s dead cold. This is one of the little bits of gold from John Muir’s How To Keep Your Volkswagen Alive: A Manual of Step-By-Step Procedures For The Compleat Idiot that has remained with me for nearly 40 years.
I had adjusted Louie’s valves when I resurrected him in Louisville last year. At that time, there was no issue with the valve adjustment per se, but during the process, I found that the stud securing the lower left corner of the valve cover was missing; it had been replaced with a crude sheet-metal screw that didn’t hold the cover dow so it leaked oil from that corner onto the exhaust manifold. I sourced a Time-Sert (helicoil) kit and sank in a stud, but to my surprise, that didn’t solve the oil-leaking problem. To get the thing to seal, I had to coat the valve-cover gasket with sealant. I hadn’t touched it since then.
Now, it wasn’t that the valves had grown loud or anything; they hadn’t. But I’d put several thousand miles on the car since it had sat for a decade and been barely driven since 1980. I knew it was going to be a bit of a bear getting the sealed valve cover off, but I never really considered punting on it. The prudent thing to do was to check the valves. So off came the valve cover.
And a bear it was to get off.
I had to pry up a corner and work it off with a right-angle hook tool and a screwdriver, rolling the end of the tool and sliding the blade of the screwdriver between the gasket and the cover until it popped free. And when it did, it didn’t do so cleanly; it left pieces of the gasket and old sealant on the upper head surface—very messy and inconvenient. I had to carefully clean the upper head surface with a razor blade, carefully flicking the sealant and gasket pieces to the outside, taking as much care as possible that the pieces weren’t falling down into the head. If they did, they’d probably go down the oil passageways, through the block, and into the pan. I kicked myself that I’d just changed the oil a few days prior, and realized that I’d done these two thing in the wrong order. I thought that, for peace of mind, when I was done, I might just spend the fifteen bucks for another five quarts of 10W40 Castrol and change it again. I also made a mental note to order some Hylomar re-sealing adhesive for the valve cover instead of using the RTV black, which is what I had with me a year ago in Louisville.
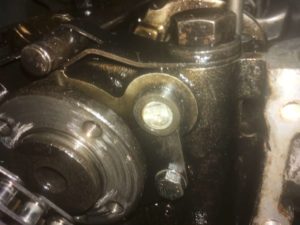
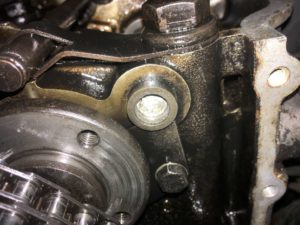
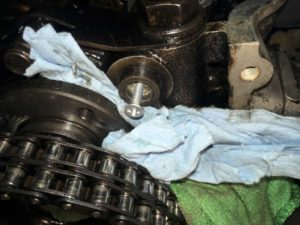
And then, while I was scraping adhesive near the front of the head, I saw it. I probably stared at it and experienced a full four seconds of cognitive dissonance before I fully groked what I was looking at: The end plug had popped out of the intake-side rocker shaft; it was pressing against the back of the cam gear, and was about to fall down inside the engine.
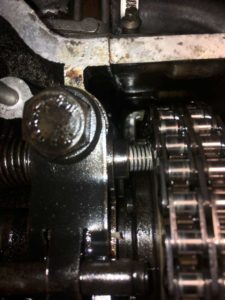
I should explain that the rocker shafts are part of the oil flow through the head. Oil enters the intake rocker shaft at the rear. The shafts have holes in them that line up with oil passages in the head, through which the oil lubricates the camshaft journals. This all occurs under pressure, so if the plug at the end of the intake rocker shaft is missing, in addition to the danger of the plug falling down inside the engine and wreaking ungodly havoc, oil simply dribbles out the end of the rocker shaft instead of lubricating the camshaft journals. Way not good.
My first reaction was unprintable.
My second reaction was, “Thank heaven I pulled the valve cover off to adjust the valves and found this before it grenaded my motor.”
My third reaction was, “Good lord, how long was I driving with it like this?” I recalled that after I got home from Louisville a year ago, I found that the engine was missing the nut securing the hub to the crankshaft. Louie has been a great car, but he has thrown me a few curve balls.
My fourth reaction, and one that involved physical action, was to take a small screwdriver and gently nudge the plug back into place so that it wouldn’t drop down into the engine—a decision, as it turned out, that I would deeply regret.
I searched on bmw2002faq.com and learned that having a rocker end plug pop out is not that unusual. I later learned that the older-style rocker shafts had knurled plugs that were pressed in; the later style had threaded plugs with an Allen-key hole in the end. Having one of the older-style knurled ones work itself loose is not unheard of; the plug itself is just soft aluminum, and the knurls can wear down.
The thing to do seemed to be to pull the plug out and replace it with a new one. Unfortunately, as I said, I’d already gently pushed it back into the end of the shaft. To get it out, I needed to have access to it, which meant pulling off the upper timing cover and the cam gear so that I could get a straight shot at it. There was risk in this, as the upper timing cover sits on the end of the head gasket, and there was a distinct possibility that a piece of the head gasket could shred just the way my valve-cover gasket did.
But I had little choice, so that’s what I did. I was hugely relieved that the upper timing cover came off cleanly and easily without shredding the part of the head gasket that sits beneath it. However, I had no luck pulling out the plug; I tried to hook around the edge with a tiny screwdriver, but everything I did just pushed the plug further in.
At the time, I didn’t realize that I had one of the knurled plugs. I thought it was a threaded plug. In retrospect, it should’ve been obvious by the lack of an Allen-key hole, but I wasn’t thinking straight. I thought that if I could get something to bite into the plug, I could unscrew it. I mean, it had just practically fallen out; how tight could it be? So I made a second fatal mistake: I took a small hex screwdriver bit and tapped it into the end of the soft aluminum plug with a hammer, thinking that I could then simply unscrew it. Of course, there were no threads on the plug, just knurls, so there was no unscrewing to be done. All I did was drive the plug in further, and screw myself. It wasn’t until I read more and learned about the two kinds of plugs that I realized the fatal folly of my ways.
Okay, I thought, no problem: I’ll just order a new plug and smack it in behind the original plug. No harm in having two, right? People tap two transmission selector-shaft seals in place all the time, right? This would be similar—and very Hack.
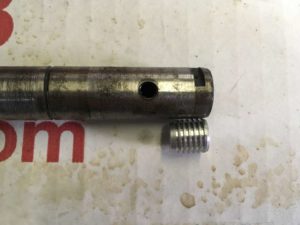
I posted this idea to Facebook, and fortunately my friend and mentor Terry Sayther warned me not to do it; it seems that an oil passageway in the rocker shaft is pretty close to the end, and there’s probably not room for a second plug. I rummaged around in the garage and found an old rocker shaft, and when the new plug arrived in the mail, held it up against the shaft. Terry was absolutely right: If I hammered in another plug, the first one would block the hole in the shaft that feeds the front-most cam journal bearing. Not good.
Terry and Doc Provensa then chimed in on Facebook that one solution to this is that there is a BMW part that’s a little bracket, held in place by the head bolt near the end of the shaft, that overhangs the end of the shaft and prevents the plug from falling out. Unfortunately, I searched RealOEM for it and couldn’t find it.
This was an unusual situation. The part was simply a plug. It wasn’t a moving part. All it needed to do was plug up the end of the shaft and not fall out. And yet, the metric of such a repair is whether, when it is done, it’s out of mind, or whether instead you worry about it every mile you’re driving for the duration of your ownership of the car.
I began to think that if I couldn’t get the plug out and replace it with a new one that I was convinced would stay in place, the “correct” fix would be to pull the head and replace the rocker shaft. This was beginning to feel like the situation with Kugel, my other ’72 tii, when, six weeks prior to leaving for MidAmerica 02Fest a few years back, I decided, for a number of reasons, to prophylactically replace the head gasket. As part of doing that, you have to come to peace with the fact that you need to deal with whatever you find. While the head was off, I found some score marks in the cylinders that were alarming, and I wound up honing the block and replacing the rings. With only a few weeks before Louie needed to get to the Foundation, I was not willing to go down a similar rabbit hole.
Folks chimed in with ideas like suction, or JB Weld on the end of a stick, but because I’d smacked the plug, it was already far too secure for something like that. I decided that what I’d do is drill a small hole partially through the soft aluminum plug, put a screw into the hole, and use that to try to pull it out. The idea was to drill the hole partially through because if I drilled a hole all the way through and couldn’t pull the plug out, then I’d be totally boned and would have little choice but to pull the head and replace the shaft.
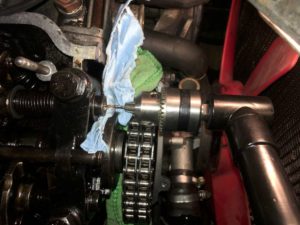
So that’s what I did. Because the end of the head is close to the nose of the car, there’s not enough clearance to get a straight shot at the plug with a standard drill, so I ordered a right-angle drill attachment. I packed the area beneath the plug with rags to catch any shavings. As it turned out, the fact that the plug was aluminum meant that the drill created shaving threads that largely stayed in the bit rather than chips that flew everywhere, and I could drill for a few seconds, stop, clean the bit, and then proceed.
Once the hole was drilled, I sank a small sheet-metal screw into it and tightened it. Again, this wasn’t a threaded plug, it was a knurled plug, so I was hoping that tightening the screw would break the plug loose. Unfortunately, it didn’t.
So I tried levering the plug out by putting a pair of needle-nose Vise Grips on the screw, and rocking them on the end of the shaft while simultaneously turning them. I did this gently, then literally went for broke—and snapped the screw in half. I looked in horror at the snapped-off screw protruding from the end of the shaft. Fortunately, using the needle-nose Vise Grips, I was able to loosen the screw and back the snapped-off piece out of the hole.
The plug never budged.
I tried this one more time, using a slightly larger sheet-metal screw. Again I screwed it into the end of the plug and tightened it as much as I could. Again it failed to cause the plug to rotate loose. Again I tried to lever it out with Vise Grips. Again it never budged. Again I went for broke.
This time the screw pulled out of the threads it had cut in the hole.
We’re done here. On the negative side, I felt like an idiot because I had blown my chance to pluck out the plug when it was dangling over the precipice and threatening to drop into the engine, and I blew it by pushing it in to what I thought was a safe place. But on the positive side, the plug wasn’t budging.
So, to do the belts and suspenders bit, I took a punch-chisel and a hammer, and peened the plug where the end of it met the inside surface of the shaft, in about eight places. I thought, I’m not thrilled about this; I will worry about it all 900 miles down to Greer, but if I really thought the plug was going to come out, I’d do something else.
And then, Facebook friend Zenon Holtz saved me. He found the brackets on eBay. They are listed as part
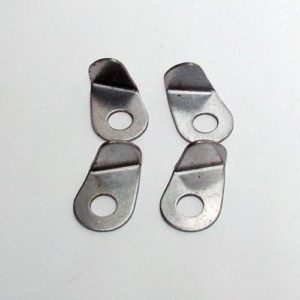
number 11 33 1 277 413 for an M30 engine. They should be here early next week.
With belts, suspenders, and my goddamn pants stapled to my hips, I think I’ll be good. And, as far as the punch list goes, perhaps I should ratchet down the rhetoric. It’s not a punch list; no one’s getting punched. Peened, perhaps, but not punched.
It’s not a punch list, it’s a joint declaration of mechanical intent.—Rob Siegel
Got a question for Rob Siegel, the Hack Mechanic? You can find him in the BMW CCA Forums here!
Rob’s new book, Ran When Parked: How I Resurrected a Decade-Dead 1972 BMW 2002tii and Road-Tripped it a Thousand Miles Back Home, and How You Can, Too, is now available on Amazon. Or you can order personally inscribed copies through Rob’s website: www.robsiegel.com.