First, to close out last week’s piece on the Black Shark: The $25 Chinese-made viscous fan clutch I ordered on eBay arrived. I installed it, and it solved the hot-running problem. The gentleman (Jordan Berube) who’d PayPalled me a $100 deposit came by on Saturday; he loved the car, bought it on the spot, drove it back to Nashua without a hiccup, and began taking it to events the following day. I’d say that it found the right owner.

This is the only photo of Sharkey and the Black Shark together before the Black Shark fledged and left the nest. The kids grow up so fast these days! (Okay, sharks, birds: weird analogy.)
On to this week’s story: I’ve been preparing Sharkey, the ’79 Euro 635CSi (my other E24) for the 2,000-mile round trip to the Vintage in Asheville next week. Sharkey is a fairly well-sorted but by no means restored car. I drove him nearly 3,000 miles round-trip to Southeast Sharkfest a few years ago; since then, he’s received a retrofitted air-conditioning system, a new gas tank, a differential that isn’t so ridiculously long-legged, new front Bilstein struts, and a tightened-up shifter, so I’m looking forward to the drive. As much as I love my 2002tii’s and might prefer one if I were planning on running down the Blue Ridge Parkway, the bigger M30-powered cars—the 3.0CSi, the Bavaria, and Sharkey—are quieter, smoother, and more comfortable as they inhale the Interstate on these kinds of road trips.
Although I didn’t find anything amiss in a cursory inspection of Sharkey, it occurred to me that I’d never adjusted the car’s valves. So it was clearly time for Sharkey and me to share the quiet intimate experience that transpires between an owner and a car when the latter exposes its valvetrain and the former gets his hands in it.
I love adjusting valves. I love the connection you feel with the machinery. I love the fact that every time I do it, I think back to reading John Muir’s classic book How To Keep Your Volkswagen Alive: A Manual of Step-by-Step Procedures for the Compleat Idiot and marveling at the passage where he explains that valve adjustment should be done with the engine dead cold, how you can do it with the engine dead cold since the car can sit in your garage or driveway overnight, but how a repair shop will start the car and pull it into a repair bay when it’s convenient for them, thus the engine won’t be dead cold and they’ll set the valves too tight; and how, because of this, you can and necessarily will do a better job adjusting your own valves than a repair shop. I can trace several very important threads in the garment of my Hack Mechanic existence to this moment.
Valve adjustment in the three commonly-used single-overhead-cam BMW engines (the four-cylinder M10 in the 2002, the Baby Six M20 in the E30, and the Big Six M30 in the 5, 6, and 7 Series cars) is basically the same.
- Remove the valve cover.
- Rotate the engine to get a cylinder to top dead center (TDC) so both valves are completely closed, with their cam lobes pointing down and the rocker arms on the flat spots on the back of the cam.
- Check the clearance between the eccentric on the rocker arm and the top of the valve stem using a feeler gauge. If it’s out of spec, adjust it using a 10-mm wrench to loosen the adjuster bolt and a right-angle piece of metal like a bent coat hanger or an Allen key to move the eccentric adjuster, and re-check it with the feeler gauge.
- Rotate the engine to put the next piston at TDC. Repeat until done.
It sounds easy—and really, it is. But as with most things, the devil is in the details.
My Two Rules: I have two over-arching rules for adjusting valves. They’re pretty simple:
1. Don’t drop anything down the engine. That valvetrain is just yawning open at you, saying, “Give us your tired, your poor, the pencil behind your ear, the paperclip you forgot you had in your front shirt pocket.” Don’t let anything fall into the engine. Make sure there’s no loose foam under the hood. And don’t use a small, straight rod to adjust the eccentric. Make sure it has a big enough bend or right angle in it that it can’t slide down an oil drain passage and into the pan. Ask me how I know.
2. Adjust the valves while you’re in there to adjust the valves. That is, if one of them is just a little too loose or just a little too tight, take the two minutes to get it right.
Okay. You know the rules. Let’s go.
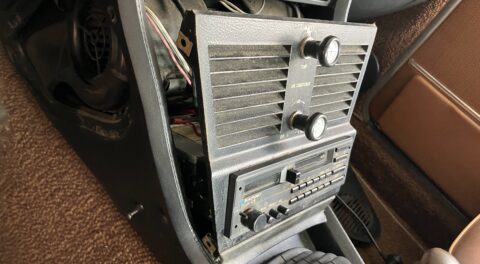
Exposing the valvetrain: Valve adjustment on a 2002 is trivial partly because there’s nothing in the way of the valve cover; simply undo the bolts holding on the cover and have at it. In contrast, on an injected M30 engine like my 635CSi’s, there’s more stuff to get out of the way (air-flow meter and filter). And the valve cover itself is bolted to the intake manifold.
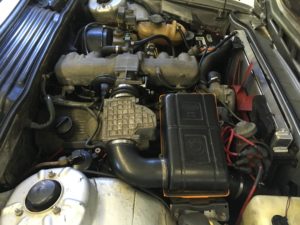
Ideally, you’d thoroughly clean the valve cover with Gunk or brake cleaner, a stiff brush, and water before removing it. If you don’t do that, do whatever you can to minimize the chance of dirt falling into the exposed valvetrain when you pull the cover off. I didn’t use any solvent on Sharkey’s valve cover, but I paper-toweled it off, then blew off any loose dirt with compressed air. Then I removed the bolts holding the cover on, and blew it off again.
Part of the wiring harness overhung the valve train. On a nearly 40-year-old car, engine-compartment wires can get brittle. Rather than try to pull the harness out of the way, I cleaned any loose dirt off the bottom, left it in place, and slid the valve cover out from beneath it.
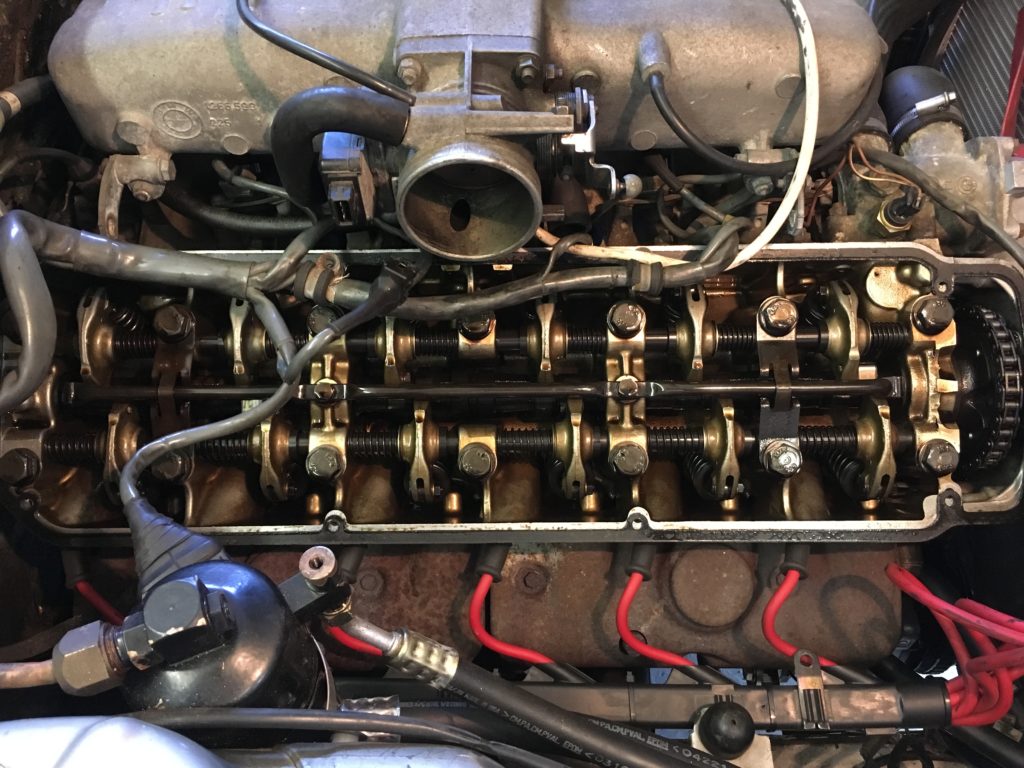
Sharkey exposes his valvetrain.
Specifications: The three engines have different clearance specs. M10 engines in 2002s have a valve clearance, or lash, spec of 0.006 to 0.008 inches. M20 motors in E30s are specced at 0.010 to 0.012, but you can find posts where people prefer to run them tighter, at 0.008 to 0.010. Early non-Motoronic M30 motors are specced at 0.010 to 0.012. The later Motronic engines are specced the loosest of all, at 0.012 to 0.014.
The greater the clearance, the more your engine will make that familiar “tick-tick-tick” valvetrain noise. Conversely, the smaller the clearance, the quieter your engine will be; in addition to quiet, there are some folks who swear that their car is more powerful when the valves are tighter (I have always been dubious of these claims). But tighter clearances do not come for free; in general, looser is safer, because valve clearances that are too tight can cause exhaust valves not to fully close, and when that happens, they begin to burn.

These tools are all you need for valve adjustment.
Tools: To check the valve gap, you need a feeler gauge of the appropriate size. I have always used angled “go/no-go” feeler gauges with the same specification as the valve clearance. That is, if the valve spec is 0.010 to 0.012, I use a 0.010-to-0.012 go/no-go feeler gauge. The “go/no-go” refers to the flat part of the blades having a step in them. They’re especially good for the novice because, again using the 0.010 to 0.012 spec as an example, if you use a 0.010-0.012 go/no-go feeler gauge, and the broad flat 0.010 part of the feeler gauge slides between the valve stem and the adjuster but it stops at the 0.012 step, then the clearance is within spec. Once you get good at it, you can judge if the broad flat part feels a little loose, and tighten the eccentric slightly so that you’re closer to the tight end of the spec than the loose end.
Once you’ve taken the valve cover off, the only other tools you need for the valve adjustment are a 10-mm wrench for the nut holding the eccentric, and a small Allen key or a coat hanger with a bent tip to put into the hole in the adjuster and move it.
Rotating the engine: There are several ways to rotate the engine to get a cylinder into position for valve adjustment. For all of them, particularly on a large high-compression engine, it’s easiest if you first remove the spark plugs so you’re not pushing against the engine’s compression.
- You can block the wheels, put the car in neutral, put a socket and wrench on the crankshaft nut, and turn it.
- If you have the special tool, you can attach it to the timing chain as it goes around the camshaft gear, and turn the engine by moving the chain and rotating the gear.
- You can put the car in gear and rock it forward, letting the wheels-differential-driveshaft-transmission-clutch-flywheel connection bump the engine around.
- You can jack one rear wheel up, leaving the other one on the ground. If the car doesn’t have a limited-slip differential, turning the rear wheel with the car in gear should spin the engine.
- On a 2002, because the engine is so small and the fan is bolted directly to the water pump, I usually block the wheels, put the car in neutral, put the heel of my hand on the fan belt to tighten it, and just grab the fan blades and turn them; this, through the fan belt, turns the engine. Note that some folks think that this bad practice because it may weaken the fan blades. Note also that on M20 and M30-equipped cars, this won’t work because the fan is coupled to the water pump with a fan clutch. To rotate Sharkey’s engine, I did something similar: I tightened the fan belt with the heel of my hand, then turned the alternator with a wrench.
Note that when you use the fan-belt method, you often wind up turning the engine counter-clockwise as viewed from the front. The normal direction of engine rotation on most cars is clockwise. Some folks feel that you should never rotate an engine backwards, as you’re running the tensioned timing chain or belt in a direction it’s not used to; the concern is that this can cause it to skip teeth. I’ve never had a problem with it, but if you’re worried about it, don’t do it.
Finding TDC: For many people, making sure that the cylinder whose valves they’re adjusting is at top dead center is the most confusing part of the valve-adjustment process. On the valves being adjusted, it’s imperative that the rockers aren’t opening the valves at all—that the clearance between the rockers and the valve stems is at its maximum. For this to happen, the cam lobes must be pointing down so the rocker arms are on the flat part of the back of the cam. It’s pretty flat back there, so even if you’re not exactly at TDC, it’s not really going to matter.
Fortunately, there’s a very simple way of verifying TDC. It’s called The Overlapped Valve Method, or The Rule Of The Companion Cylinder.
Part of the nature of a four-stroke engine is that when one cylinder is at TDC with both of its valves closed, another cylinder has both of its valves open. And it’s very easy to tell when both valves are open, because their rockers are “overlapped” on the cam lobes—that is, the intake and exhaust-cam lobes are both pushing up their rocker arms by the same amount. This is clearly visible in the photo below, though the oil-distribution tube obscures the very ends of the rocker arms.
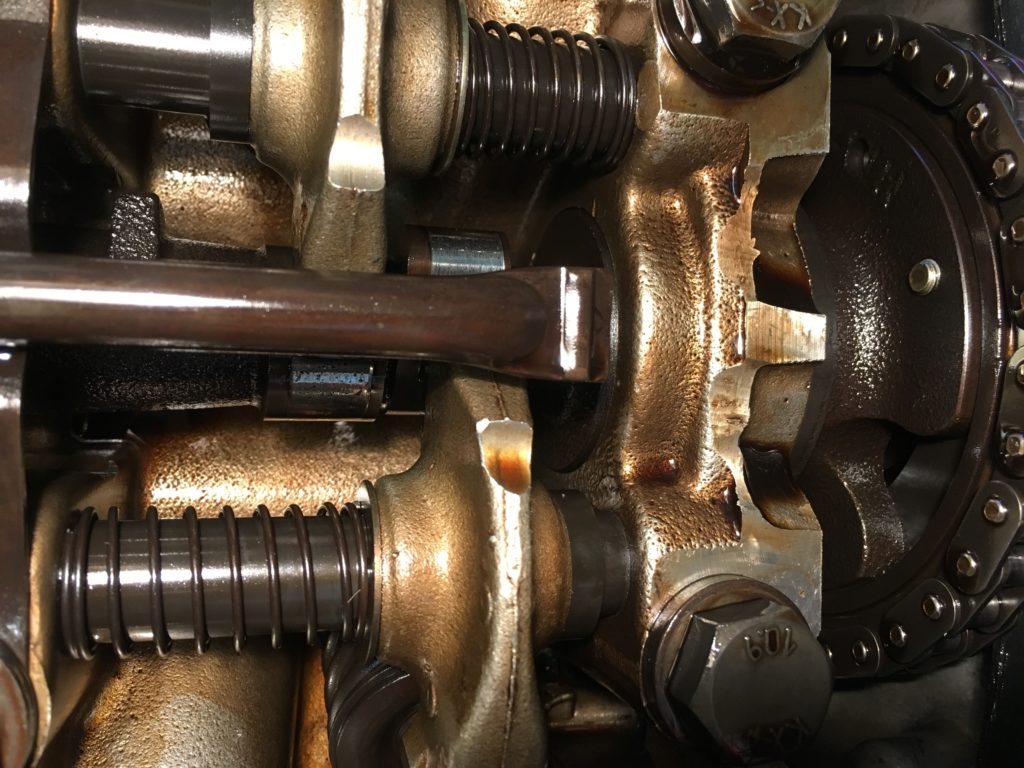
The cam lobes from Cylinder #1 are in “overlapped” position, with both rocker arms extending equally over both cam lobes.
Here’s what you do. Look at the firing order that’s written on the valve cover. On an M30, that’s 1-5-3-6-2-4. Then divide it in half and write it in two rows like this:
1 5 3
6 2 4
The columns are now “companion cylinders.” When cylinder #1 is in overlapped position, #6 is at TDC, and vice-versa. Same for 5-2 and 3-4.
So, to start the valve adjustment, look at the camshaft lobes and see which ones are closest to being overlapped, then rotate the engine until they are overlapped. Then verify that the cam lobes of the companion cylinder are pointing down. The fact that “pointing down” is an imprecise designation is exactly why you look at the overlapped rockers on the companion cylinder instead of the downward-pointing cam lobes. Then adjust the valves for that cylinder. Write the “companion cylinder” list on a piece of paper, and cross off the number as you adjust that valve.
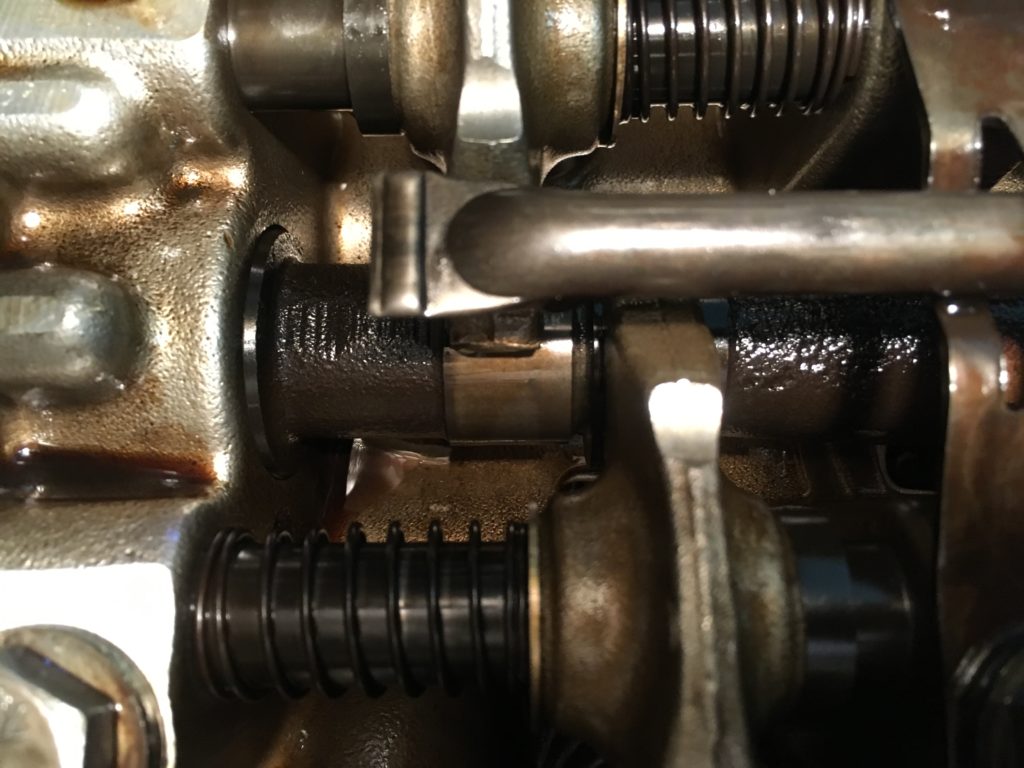
Cylinder #6’s cam lobes are pointing down. Since 1 and 6 are companion cylinders and #1’s lobes are overlapped, we can be sure that #6 is at TDC and its valves are ready to be adjusted.
The actual valve adjustment: To be absolutely clear about this, you don’t ever actually adjust valves; you adjust the clearance between the adjuster at the end of the rocker arm and the tip of the valve stem. Some cars use threaded studs as adjusters, but BMW single-cam engines use eccentrics—round discs with an off-center hole through the side, hence the name. There’s a small hole on the edge of the eccentric into which you can stick a convenient-size coat hanger or Allen key and rotate the eccentric. Moving the adjusting hole toward the edge of the head makes the clearance between the eccentric and the valve smaller; moving it the other way increases the size of the gap. This is true for both the intake and exhaust valves.
As I said, if you slide the go/no-go feeler gauge between the top of the valve stem and the eccentric, and the tip of it slides in but it stops at the step, that valve’s clearance is in spec. But if the feeler gauge won’t go in, or goes in and slides over the step, that valve’s gap needs adjusting. The procedure is identical for both intake and exhaust valves. (Note that some folks check valve clearance between the cam lobe and the rocker instead; to each his own.)
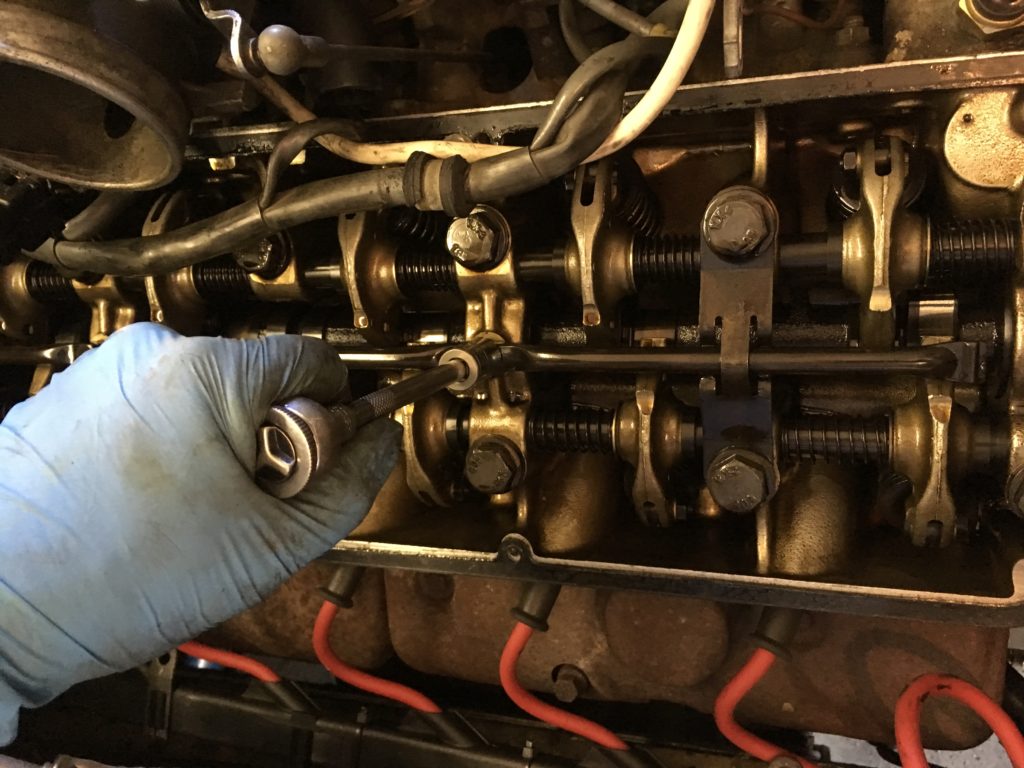
Use a 10-mm wrench to loosen the nut that holds the eccentric, but don’t loosen it so much that the eccentric flops around or moves when you slide in the feeler gauge. With experience, you’ll learn to find the tightness of the nut that makes the eccentric stay put but allows it to be moved with the Allen key. As you’re sliding the feeler gauge into the gap, use your thumb to press down on the cam side of the rocker arm to ensure that you’re opening the gap up as wide as possible. Then adjust the eccentric so that the feeler gauge goes into the gap, but stops at the step. I usually move the eccentric, then re-try the feeler gauge, but you can also open the gap wide enough to put the feeler gauge in, then gradually tighten the eccentric with the blade in place. Just don’t over-tighten and mar the feeler gauge.
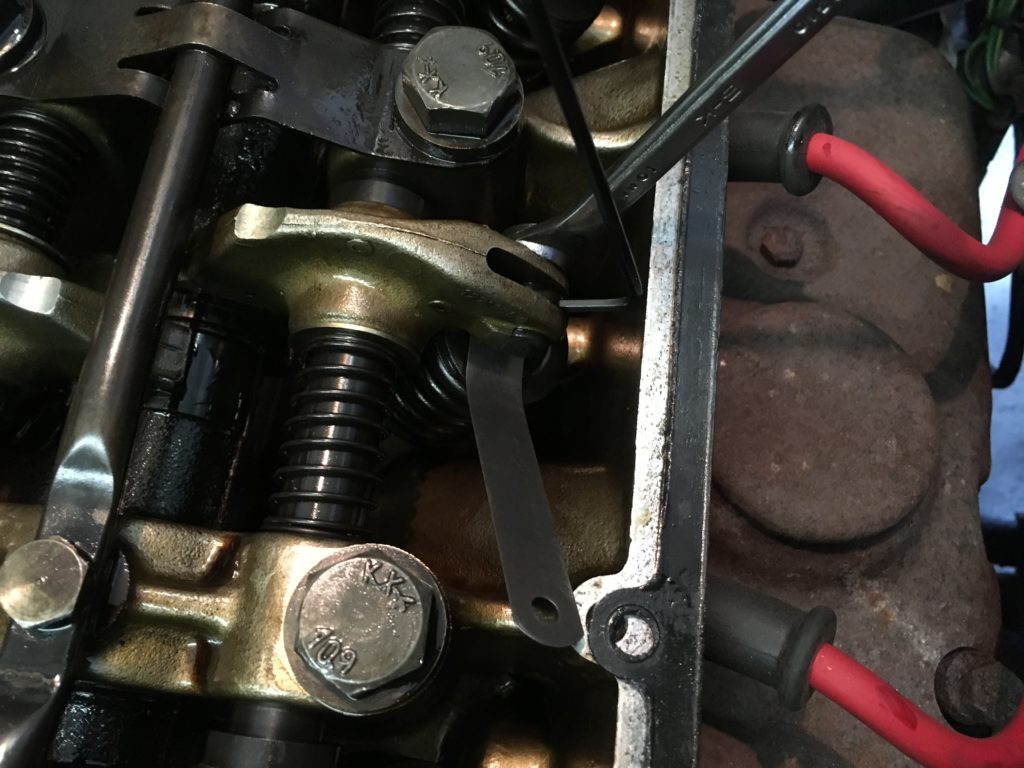
Feeler gauge, 10-mm wrench, and Allen key in adjuster hole (image is for reference only. You almost certainly wouldn’t have all three of these in place at the same time; usually I use only one at a time).
The eccentrics on some of the cylinders have ample access for the feeler gauge to be slid in, but on others, particularly on the six-cylinder cars, the castings for the head bolts make it challenging to approach the gap. This is why I prefer angled feeler gauges. If you don’t have the feeler gauge level, the gap will feel much tighter than it actually is. When you think you’ve got it right, try approaching the gap from the other side to check it again.
When you think it’s right, partially tighten the nut, and re-check the gap. Then snug the nut down for good, and check the gap again; sometimes tightening the nut moves the eccentric. Get it right, even if you have to do it six times. To quote John Muir, you have all the time in the world.
When you think you’re done with that valve, check both the intake and exhaust gaps one last time, then look at the companion cylinder list, cross off the cylinder whose valves you just adjusted, and rotate the engine to the next companion cylinder. Remember that if you’re using the “heel of your hand on the fan belt” method, you’re probably turning the engine backwards, and thus have to look backwards in the firing order.
When you’re done, if you have any doubt whatsoever that you did it right, turn the engine in its firing order again and re-check them all. It probably takes less than two minutes to check them all if you find nothing wrong, and if you do find something wrong, you’ll be glad as hell that you took the time to recheck.
With Sharkey, I had to adjust eleven of the twelve valves. Of those, ten were too tight. I was glad we spent the time together, and now I feel much better about driving the car 2,000 miles.
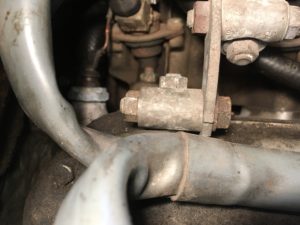
When I was done with the valve adjustment, I checked two other things: that the 12-mm banjo bolts holding the oil distribution tube were tight (if they loosen, oil flow to the front can stop, causing dramatic wear on the front cam lobes), and that no rocker-shaft end plugs were ready to swan-dive into the timing chain, as they were on Louie before his trip down to the BMW CCA Foundation in February.
Make sure the banjo bolts holding the oil distribution tube are tight.
And with that, the last of the preventive maintenance on Sharkey prior to the Vintage is done (he says, clearly inviting automotive lightning to strike him dead). With luck, next week is little more than packing (let’s just double the size of the target for that lightning, shall we?). We hit the road Wednesday morning. I expect clear skies, cool running, and zero problems. (Okay, now you’re just actively taunting.)—Rob Siegel
Rob’s new recent book, Just Needs a Recharge: The Hack MechanicTM Guide to Vintage Air Conditioning, is available here on Amazon. Or you can order personally inscribed copies through Rob’s website: www.robsiegel.com.